
Hatching Ducklings Like a Pro: Step-by-Step Incubation & Brooder Guide!
Last updated: February 14th, 2026
To keep our research-backed guides free, this site uses ads and affiliate links (earning a small commission at no cost to you). Everything here is created by a duck mom and PhD scientist, combining academic rigor with hands-on experience to provide practical, trustworthy advice for duck keepers everywhere. 🦆 Learn more
Hatching ducklings is exciting, but it is also a process that requires precision, planning, and the right setup. Whether you are using an incubator or relying on a broody duck, understanding the biology behind duck egg development dramatically improves your chances of a successful hatch.
Duck embryos are sensitive to temperature fluctuations, improper humidity, poor ventilation, and handling mistakes. Small errors during the 28-day incubation period can affect hatch rates and long-term duckling health. That is why preparation matters.
And once ducklings hatch, the real work begins.
Newly hatched ducklings need a carefully designed brooder that supports proper thermoregulation, safe hydration, healthy leg development, and strong immune function. A poorly set up brooder can lead to preventable health issues within days.
In this guide, I will walk you through:
• How to incubate duck eggs correctly
• Ideal temperature and humidity ranges
• What to expect during lockdown and hatch day
• How to set up a safe brooder for ducklings
• Common mistakes to avoid
With the right knowledge and preparation, you can give your ducklings the safest possible start in life.
Ducks of Providence is free, thanks to reader support! Ads and affiliate links help us cover costs—if you shop through our links, we may earn a small commission at no extra cost to you. Thanks for helping keep our content free and our ducks happy! 🦆 Learn more
Part of the Beginner’s Handbook, Essential foundational data for new duck parents.
Quick Navigation: Jump to a Section
[hide]
- Choosing Fertile Eggs
- Incubation Process
- Natural Hatching with a Broody Duck
- 1. Choosing a Broody Duck
- 2. Setting Up a Nest for the Broody Duck
- 3. Selecting & Preparing Eggs
- 4. Managing the Broody Duck During Incubation
- 5. Candling the Eggs (Optional Check for Development)
- 6. Hatching (Day 26-28, or Day 32-35 for Muscovies)
- 7. After Hatching: Caring for the Mother & Ducklings
- 8. Common Problems & Solutions
- Hatching & Assisting Ducklings
- Caring for Newly Hatched Ducklings
- Freebie: Duckling Care Checklist
- Further Reading & Resources
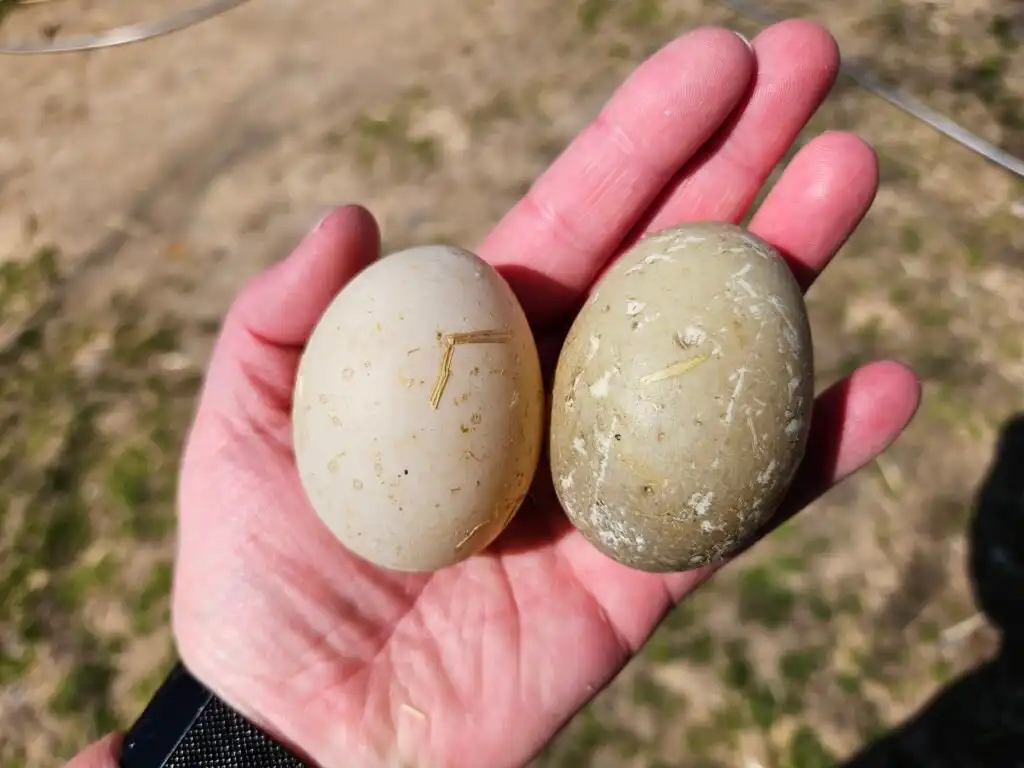
Choosing Fertile Eggs
Selecting high-quality, fertile eggs is the first step to a successful hatch. Whether you collect eggs from your own flock or purchase them from a breeder, several factors determine whether the eggs will develop into healthy ducklings.
1. Where to Get Fertile Duck Eggs
- From Your Own Flock: If you have a drake (male duck) with your hens, there’s a good chance their eggs are fertile. The ideal drake-to-hen ratio is 1 drake per 4-6 hens to ensure good fertility without excessive mating stress.
- Buying from a Breeder: If you don’t have a drake, you can purchase fertile eggs from reputable breeders or hatcheries, such as Metzer Farms. Look for a seller who collects eggs daily and properly stores them before shipping. Ask about their flock’s health and breeding conditions to ensure you get high-quality eggs.
2. Selecting the Best Eggs for Incubation
Not all eggs are suitable for hatching. Here’s what to look for:
✅ Clean, Intact Shells – Avoid cracked, dented, or excessively dirty eggs. Dirty eggs may carry bacteria, while cracked eggs can dry out or become contaminated.
✅ Good Shape & Size – Choose eggs that are evenly shaped and medium-sized for the breed. Misshapen or oversized eggs may have trouble hatching.
✅ Freshness – Eggs should be no older than 7 days for the best hatch rate. Ideally, collect eggs daily and store them properly.
✅ Proper Storage Before Incubation – Store eggs pointy end down in a cool place (55-65°F/13-18°C) with 50-75% humidity. Turn them at least once daily if not incubating immediately.
3. Checking Fertility (Candling Before Incubation)
If you want to check whether an egg is likely to be fertile before incubation, you can candle it:
- Infertile Egg (Yolk Only) – A clear egg with no visible structures.
- Fertile Egg (Blastodisc vs. Blastoderm) – If you crack an egg, a fertile one will have a blastoderm (bullseye appearance) instead of a simple white spot (blastodisc).
- Once incubation starts, candle at 7-10 days to check for developing blood vessels.
4. Common Mistakes When Choosing Fertile Eggs
🚫 Using Old or Improperly Stored Eggs – Hatch rates drop significantly after 7-10 days.
🚫 Choosing Dirty or Washed Eggs – Washing removes the protective bloom, making eggs vulnerable to bacteria. Lightly brushing off dirt is fine, but don’t scrub or wash them.
🚫 Using Very Large or Very Small Eggs – Small eggs may produce weak ducklings, while large eggs may be double-yolked, which usually doesn’t result in a successful hatch.
Incubation Process
Successfully incubating duck eggs requires precise temperature, humidity, and egg-turning conditions. Duck eggs take approximately 28 days to hatch (except for Muscovy eggs, which take 35 days). Here’s a step-by-step guide to ensure the best possible hatch rate.
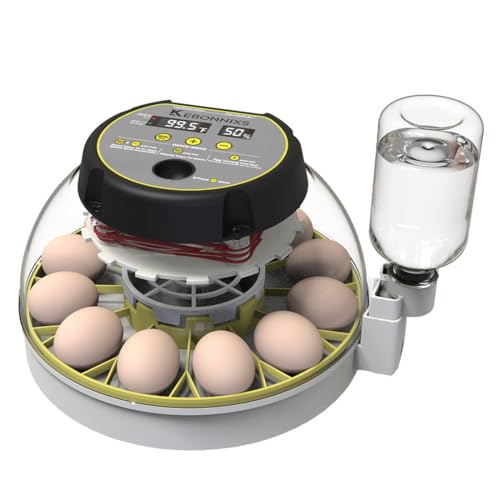
1. Setting Up the Incubator
Before placing the eggs inside, ensure the incubator is clean, properly calibrated, and running for at least 24 hours to stabilize temperature and humidity.
Ideal Incubator Conditions
| Factor | Recommended Setting |
|---|---|
| Temperature (Forced-Air Incubator) | 99.5°F (37.5°C) |
| Temperature (Still-Air Incubator) | 100-101°F (37.8-38.3°C) |
| Humidity (Days 1-25) | 50-55% |
| Humidity (Days 26-Hatch) | 65-75% |
| Turning Frequency | 3-5 times daily (until Day 25) |
Choosing an Incubator
- Forced-Air Incubators: Have built-in fans that circulate air for even temperature distribution. These provide better hatch rates.
- Still-Air Incubators: Do not have fans, so temperature must be slightly higher, and eggs must be placed carefully to ensure uniform warmth.
- Automatic vs. Manual Turning: An automatic turner saves time and ensures even incubation. If turning by hand, mark one side of each egg with an “X” and the other with an “O” to track turns.
July 13, 2026 7:56 PM


2. Placing the Eggs in the Incubator
- Position: Place eggs on their sides or pointy end down in the incubator.
- Spacing: Leave enough room for air circulation. Overcrowding can cause uneven heating.
3. Turning the Eggs
- Turn eggs at least 3-5 times per day to prevent the embryo from sticking to the shell.
- If using an automatic turner, check that it’s functioning properly.
- Stop turning eggs on Day 25 (this is called lockdown).
4. Candling the Eggs (Checking for Development)
Candling helps monitor embryo growth and identify non-developing eggs.
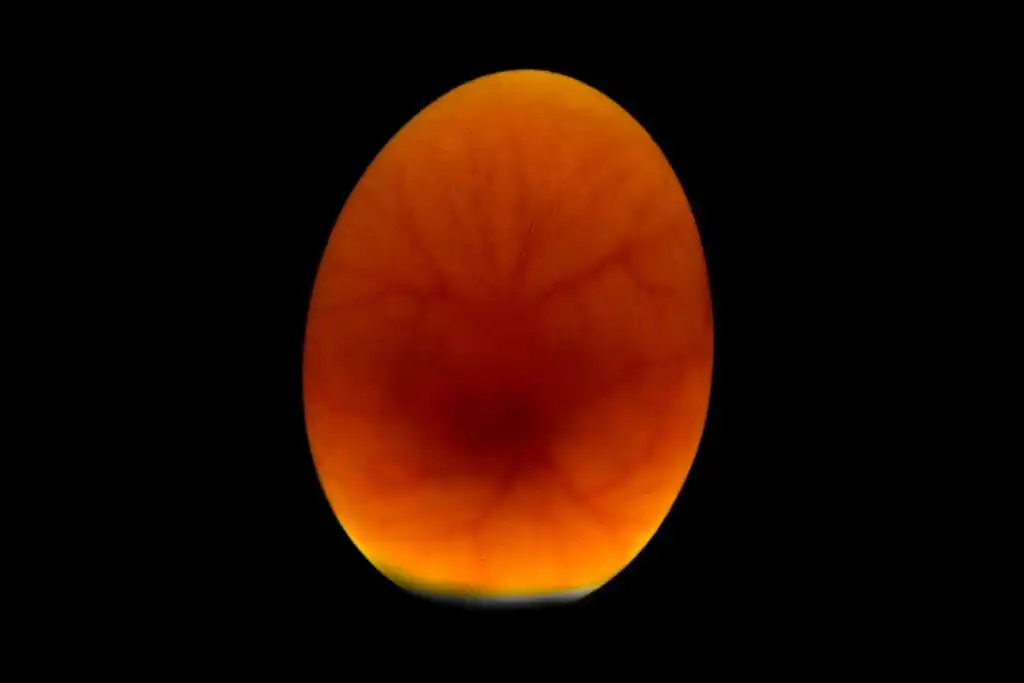
| Day | What to Look For |
|---|---|
| Day 7 | Look for blood vessels and a small embryo moving. |
| Day 14 | The embryo should be larger, with visible movement. |
| Day 21 | The duckling fills most of the egg; air cell is larger. |
| Day 25 (Lockdown) | Stop turning, increase humidity, and prepare for hatching. |
🚫 Remove any eggs that are clear or show no development after 10-14 days to prevent bacterial contamination.
5. Lockdown (Final 3 Days Before Hatching)
From Day 25 onward (Day 32 for Muscovy eggs), make key adjustments:
✅ Increase humidity to 65-75% to keep membranes moist.
✅ Stop turning the eggs to allow ducklings to position themselves.
✅ Avoid opening the incubator to maintain stable humidity and temperature.
6. Common Incubation Problems & Solutions
| Problem | Possible Cause | Solution |
|---|---|---|
| Eggs not developing | Infertile eggs, incorrect temperature | Check fertility before incubation, calibrate thermometer |
| Embryos die mid-incubation | Temperature fluctuations, bacteria | Maintain stable conditions, clean incubator before use |
| Sticky ducklings (difficulty hatching) | Low humidity | Increase humidity during lockdown |
| Late hatching (beyond Day 28) | Low temperature during incubation | Ensure correct incubator temperature |
| Early hatching | High temperature | Lower incubator temperature slightly |
Natural Hatching with a Broody Duck
Letting a broody duck hatch her own eggs can be a rewarding and natural way to raise ducklings. A dedicated mother will take care of incubation, turning the eggs, and keeping them at the right temperature and humidity. However, not all ducks will go broody, and some may need extra care and encouragement to successfully hatch a clutch.
1. Choosing a Broody Duck
Not all duck breeds are equally inclined to sit on eggs. Some breeds, like Muscovy ducks, Welsh Harlequins, and Buff Orpingtons, are naturally broody, while others, like Pekins and Runners, rarely go broody.
Signs of a Broody Duck
- Stays on the nest for long periods, leaving only briefly to eat and drink.
- Becomes protective or aggressive when approached.
- Pulls out her own feathers to line the nest.
- Rearranges eggs frequently and tucks them under her body.
If a duck is consistently sitting on eggs for a few days and displaying these behaviors, she’s likely ready to hatch a clutch.
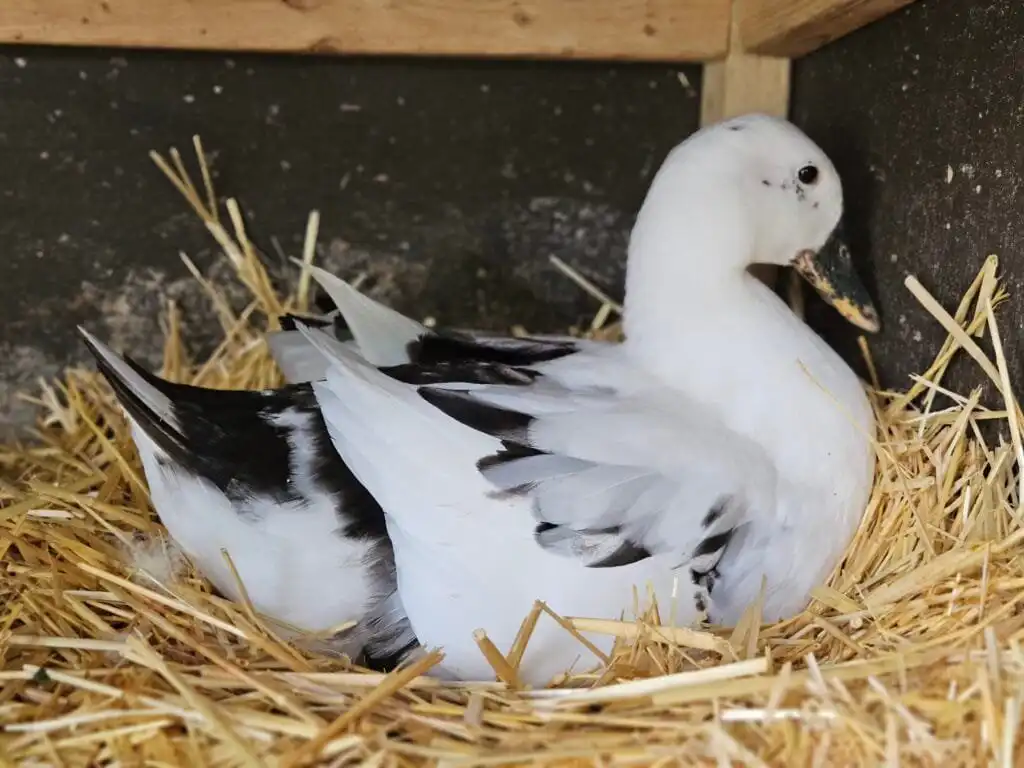
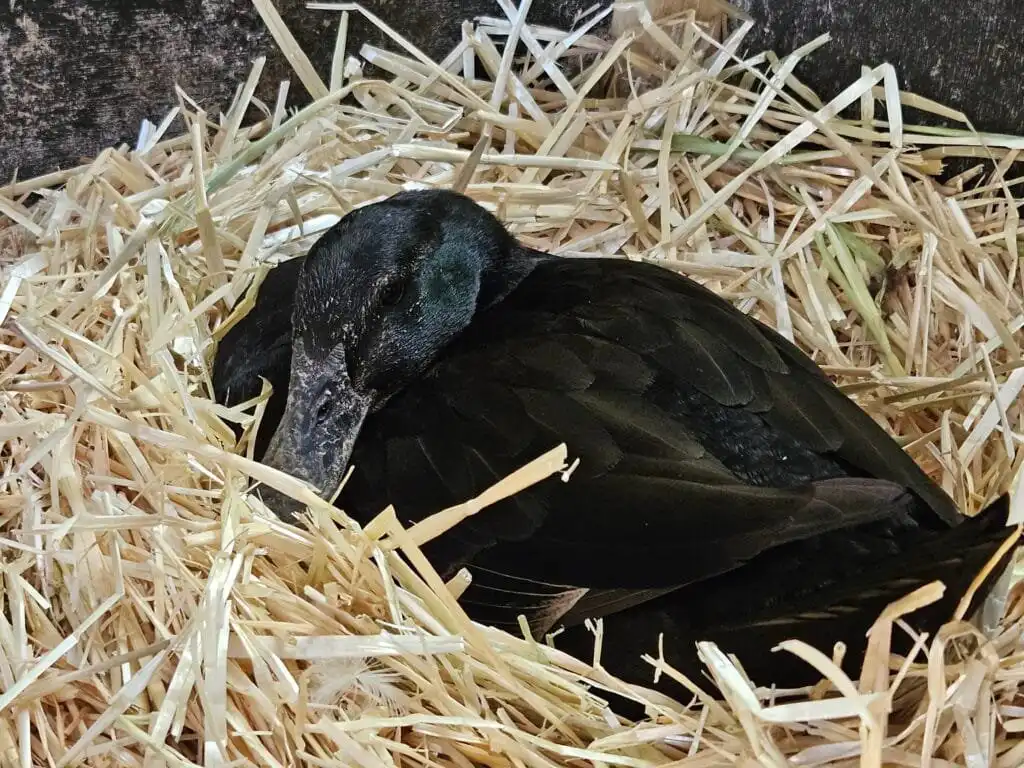
2. Setting Up a Nest for the Broody Duck
Providing a safe, comfortable, and quiet space is essential for a successful hatch.
Ideal Nesting Conditions
| Factor | Recommendation |
|---|---|
| Nest Location | Quiet, private area away from flock disturbances |
| Bedding | Soft straw, hay, or wood shavings |
| Nest Size | Roomy enough for her and the eggs, but cozy for warmth retention |
| Safety | Predator-proof enclosure to protect from threats |
| Food & Water | Close by, but not too close to prevent soiling the nest |
Make sure the nest is dry and well-ventilated, as damp conditions can cause mold or bacteria growth.
3. Selecting & Preparing Eggs
A broody duck can only cover a certain number of eggs effectively.
✅ Choose 8-15 eggs, depending on the duck’s size. Large ducks like Muscovies can handle up to 18 eggs, while smaller breeds do best with 10-12.
✅ Ensure eggs are fertile, clean (but not washed), and of uniform size.
✅ If eggs are added from another source, ensure they are laid within the last 7 days and stored properly before placing them under the duck.
4. Managing the Broody Duck During Incubation
Once the duck starts incubating, she will do most of the work but still needs monitoring and support.
What to Expect
- She will leave the nest once or twice daily to eat, drink, and bathe.
- She will instinctively turn the eggs multiple times daily.
- Her body naturally maintains the right humidity, especially if she takes a quick dip in the water before returning to the nest.
Feeding a Broody Duck
Broody ducks eat less than usual but need nutrient-rich food to stay healthy.
- Offer a high-protein feed (18-22%) to maintain strength.
- Provide fresh water nearby so she stays hydrated.
- Keep food and water away from the nest to prevent contamination.
🚨 Warning: Some ducks get so focused on sitting that they neglect eating or drinking. If she appears weak, gently encourage her to take a break.
5. Candling the Eggs (Optional Check for Development)
Unlike incubator eggs, broody ducks handle most issues themselves. However, you may want to candle the eggs around Day 7 and Day 14 to remove infertile or non-developing eggs.
- If an egg is clear (no veins) on Day 7, it is likely infertile.
- The embryo has stopped developing if an egg has a blood ring (a dark circle inside the shell).
🚨 Caution: If the duck is very protective, it may be best to let her be and trust her instincts.
6. Hatching (Day 26-28, or Day 32-35 for Muscovies)
As hatching approaches, the duck will become even more protective of the nest. Unlike artificial incubation, you do not need to increase humidity—her natural body moisture will provide the right conditions.
What to Expect During Hatch
- Around Day 25-26, you may hear peeping inside the eggs as ducklings prepare to hatch.
- The first external pip (small crack in the shell) may appear 12-24 hours before the duckling fully hatches.
- Hatching can take up to 48 hours. It’s normal for ducklings to rest between stages.
🚨 Do Not Interfere: The mother duck knows best! Avoid helping ducklings hatch unless absolutely necessary.
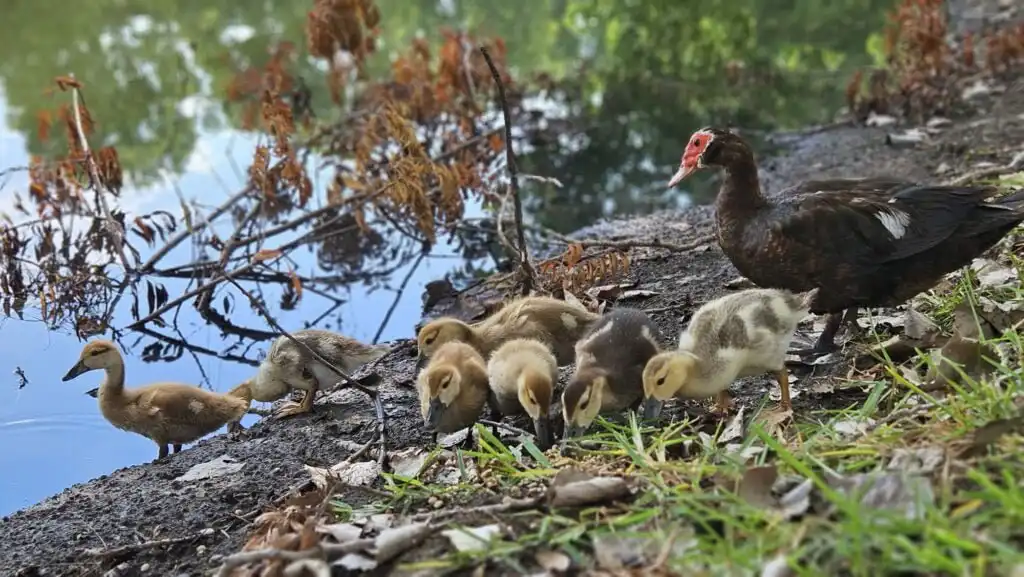
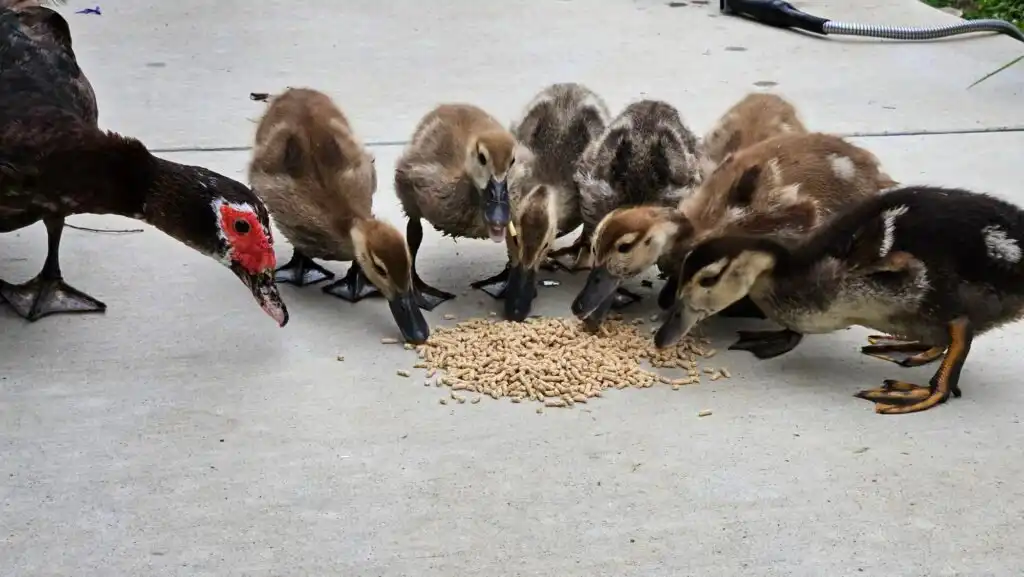
7. After Hatching: Caring for the Mother & Ducklings
Once the ducklings hatch, the mother will take care of them, but a few things can ensure a smooth transition.
✅ Keep food and water close by: Provide a shallow water dish to prevent drowning.
✅ Ensure warmth: If it’s cold, make sure the area is dry and draft-free.
✅ Monitor for weak ducklings: Most will follow their mother, but any struggling ducklings may need temporary indoor care.
After 24-48 hours, the mother may start leading her ducklings around and teaching them to eat and drink.
8. Common Problems & Solutions
| Problem | Possible Cause | Solution |
|---|---|---|
| Duck abandons the nest | Inexperience, disturbance, stress | Reduce stress, provide privacy, try fostering eggs to another broody duck |
| Eggs fail to hatch | Infertility, cold nest, improper nest location | Candle eggs early, ensure she sits consistently, provide a better nesting spot |
| Mother rejects ducklings | Weak hatchlings, stress, too many eggs hatched | Monitor closely, remove weak ducklings if needed |
| Ducklings drowning in water | Water source too deep | Use shallow dishes for drinking water |
Hatching ducklings naturally is less work than incubating eggs, but it requires careful observation and a good broody duck. If you have a willing and dedicated mother, she will handle most of the process, allowing you to enjoy watching nature take its course!
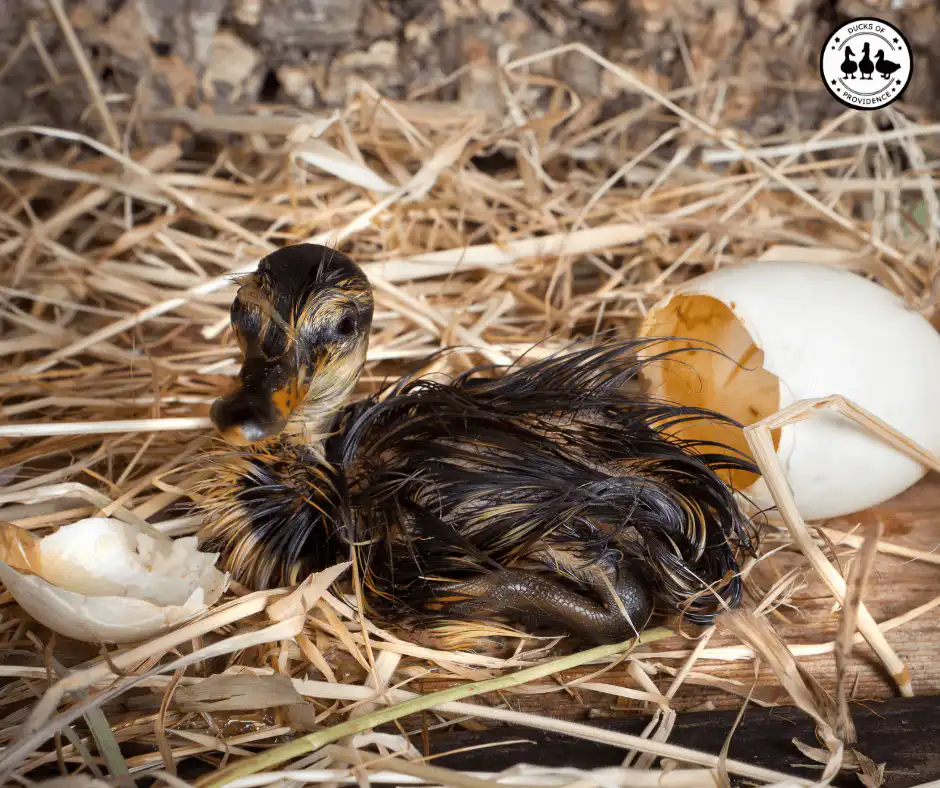
Hatching & Assisting Ducklings
The final stage of incubation is both exciting and nerve-wracking. Whether you are using an incubator or allowing a broody duck to hatch her eggs, it’s important to know what to expect, when to intervene, and when to let nature take its course. Hatching can take time, and while most ducklings emerge without help, some may need careful intervention to survive.
1. Understanding the Hatching Process
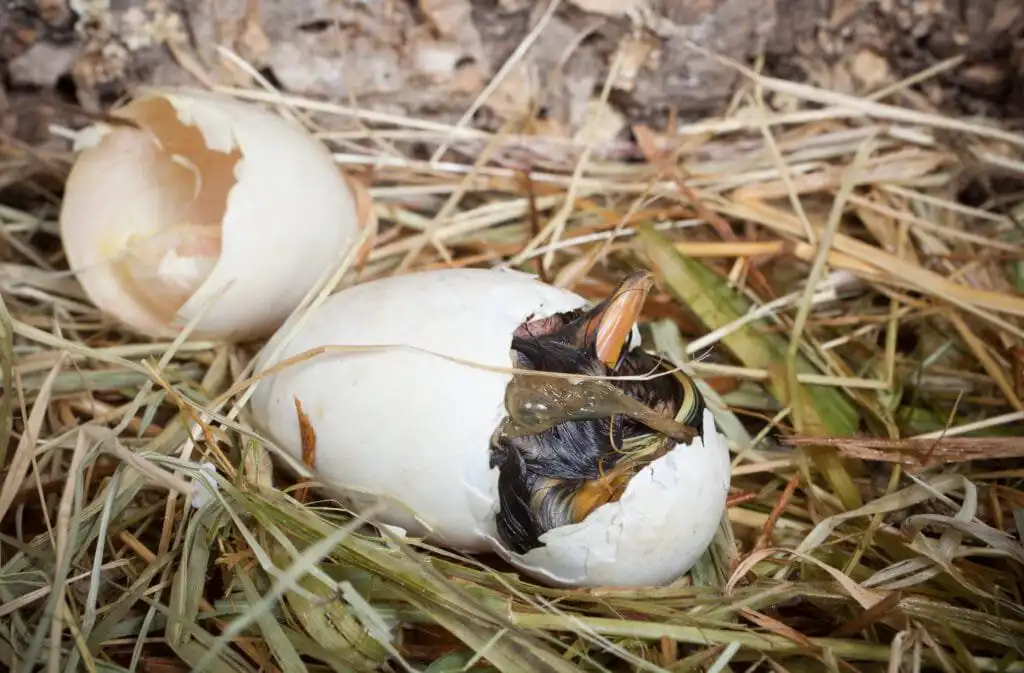
Hatching is a slow and energy-intensive process for a duckling. It typically unfolds in three stages:
Timeline of Hatching
| Stage | What Happens? | Timeframe |
|---|---|---|
| Internal Pipping | Duckling breaks through the inner membrane into the air cell and starts breathing | ~24-48 hours before hatching |
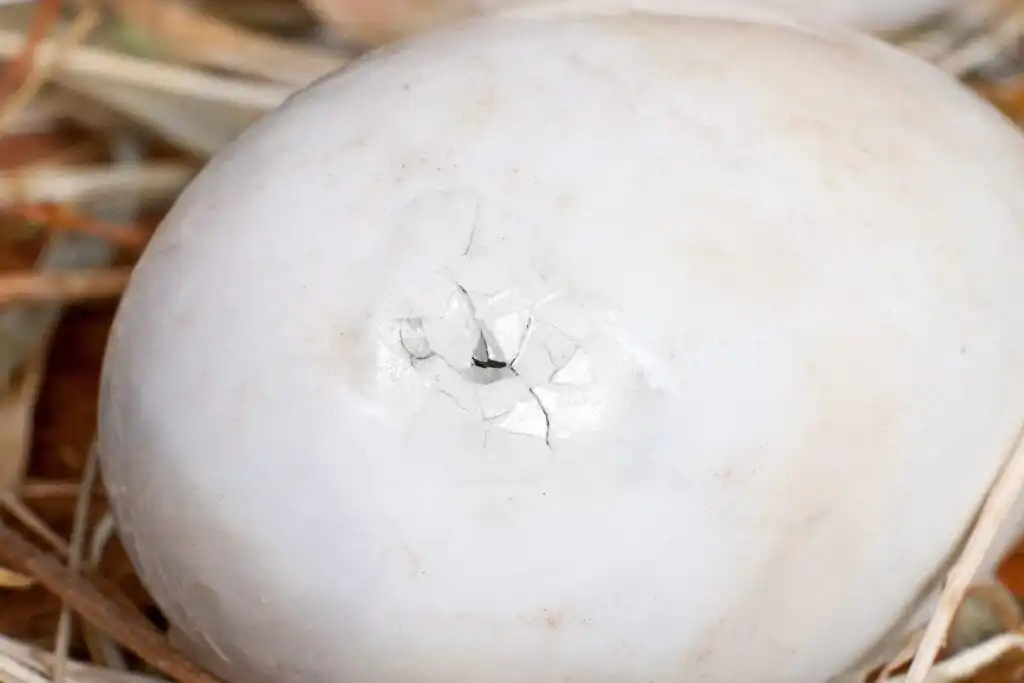
| External Pipping | Duckling cracks the shell with its egg tooth, creating a small hole | ~12-24 hours before hatching |
| Zipping & Hatching | Duckling slowly rotates inside the egg, breaking open the shell and emerging | ~1-12 hours |
Important: Ducklings rest between stages. It is normal for the process to take up to 48 hours.
2. How to Monitor a Hatching Egg
If using an incubator, ensure:
✅ Stable humidity (65-75%) – Dry conditions can cause the membrane to shrink around the duckling.
✅ Consistent temperature (99.5°F for forced-air incubators, 101°F for still-air incubators)
✅ No unnecessary opening of the incubator – This can cause humidity drops and delay hatching.
If the eggs are hatching under a broody duck, she will do most of the work. However, you should:
✅ Minimize disturbances to avoid stressing her.
✅ Ensure she stays on the nest during the final days.
🚨 Warning: If you hear loud peeping but no progress for over 24 hours, the duckling may be in distress.
3. When & How to Assist a Hatching Duckling
Most ducklings should hatch without help, but some may struggle due to:
- Weakness or malposition
- Membrane shrink-wrapping due to low humidity
- A dried-out or overly tough shell
When to Help a Duckling
Only assist if:
❌ The duckling externally pipped over 24 hours ago but has made no progress.
❌ The membrane is dry and stuck to the duckling’s feathers (signs of shrink-wrapping).
❌ The duckling is peeping loudly but unable to break free.
How to Assist a Stuck Duckling
1️⃣ Moisten the Membrane
- If the membrane is white and dry, apply a small amount of warm water or coconut oil with a cotton swab.
- Do NOT soak the egg. Just dampen the membrane enough to loosen it.
2️⃣ Carefully Remove Small Pieces of Shell
- Using clean hands or sanitized tweezers, gently remove small bits of shell near the pip hole.
- Never peel off large pieces unless you see blood vessels have receded (visible as red veins).
3️⃣ Check for Blood Vessels
- If blood is present, stop immediately and wait another few hours.
- If no blood is seen, continue gently assisting in small increments.
4️⃣ Allow the Duckling to Push Out Itself
- Once the head and upper body are free, let the duckling kick out of the shell on its own.
- Forcing it out too soon can cause umbilical bleeding or yolk sac issues.
🚨 Never remove an unabsorbed yolk sac! If the yolk isn’t fully absorbed, leave the duckling in the shell and return it to the incubator for a few more hours.
4. Common Hatching Problems & Solutions
| Problem | Cause | Solution |
|---|---|---|
| No external pip after 28+ days | Late development or infertility | Candle the egg to check for movement. If none, discard. |
| Duckling pipped but not zipping | Weakness, incorrect position, humidity too low | Monitor. If over 24 hours, assist gently. |
| Shrink-wrapped duckling (membrane stuck) | Low humidity, premature incubator opening | Moisten membrane with warm water or coconut oil. |
| Bleeding when assisting | Blood vessels not fully retracted | Stop and wait. Let the duckling absorb the remaining blood. |
| Duckling weak after hatching | Exhaustion, low oxygen, difficulty absorbing yolk | Keep warm, provide rest, and give electrolyte water if needed. |
5. After Hatching: Helping Ducklings Thrive
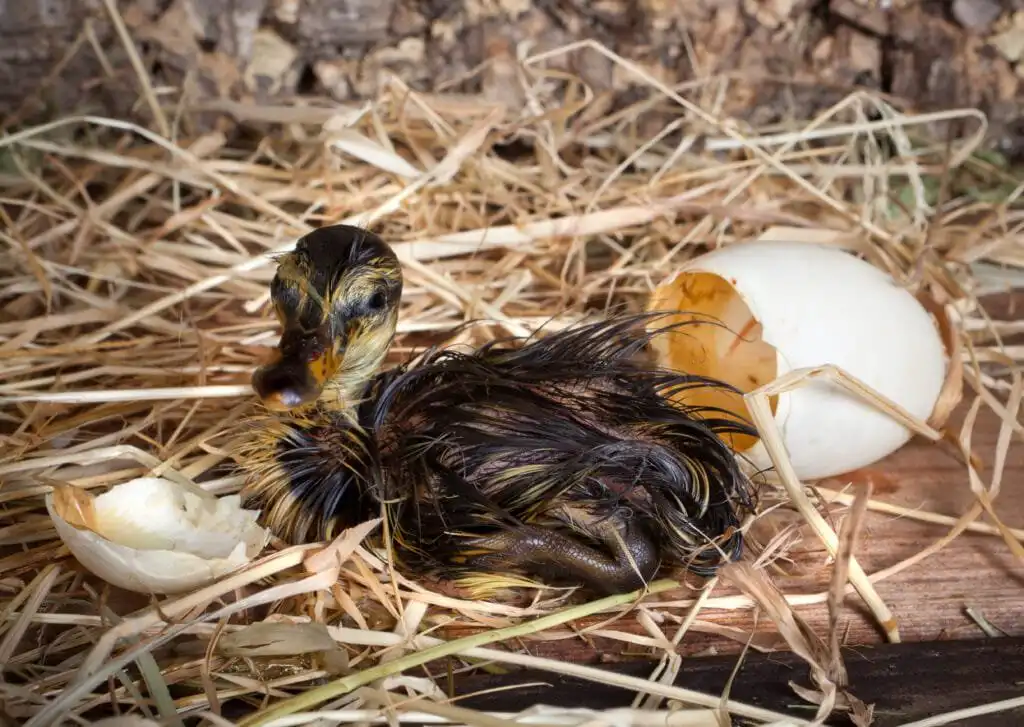
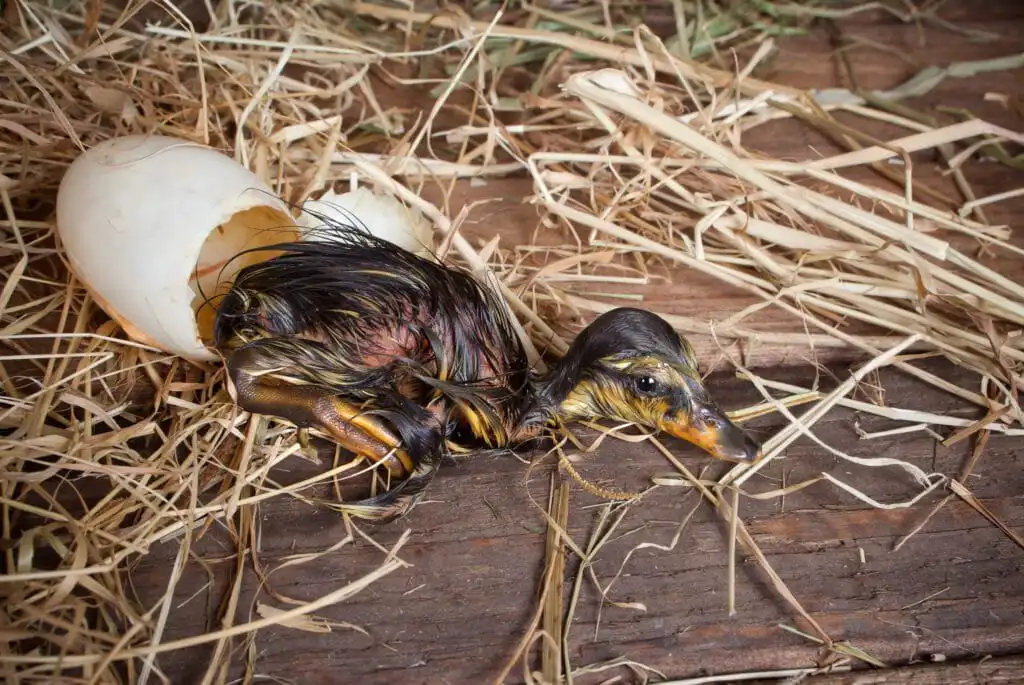
Once hatched, ducklings are wet, exhausted, and vulnerable. Whether in an incubator or under a broody hen, they need time to dry, rest, and strengthen before eating or drinking.
✅ First 24 Hours After Hatching
In an incubator:
- Leave the duckling inside for 12-24 hours until dry and fluffy.
- Keep humidity around 65% to prevent dehydration.
- Do not feed or give water immediately—ducklings absorb their yolk sac for nourishment.
Under a broody duck:
- The mother will keep the ducklings warm and lead them to food and water when ready.
- Ensure there are no deep water bowls—ducklings can drown easily.
6. Encouraging Weak or Late-Hatching Ducklings
Some ducklings may hatch late or struggle to gain strength. If a duckling seems weak:
✅ Place it in a warm, dry brooder at 95°F for the first few days.
✅ Offer electrolytes (Sav-A-Chick or hydro–hen) for an energy boost.
✅ Use a soft towel for extra support if the duckling has leg weakness.
When to Seek Help:
- Duckling won’t stand or eat after 24+ hours.
- Leg deformities prevent movement.
- Persistent panting or labored breathing.
Hatching is a delicate process that requires patience, observation, and sometimes intervention. While most ducklings hatch naturally, knowing when and how to assist can save lives.
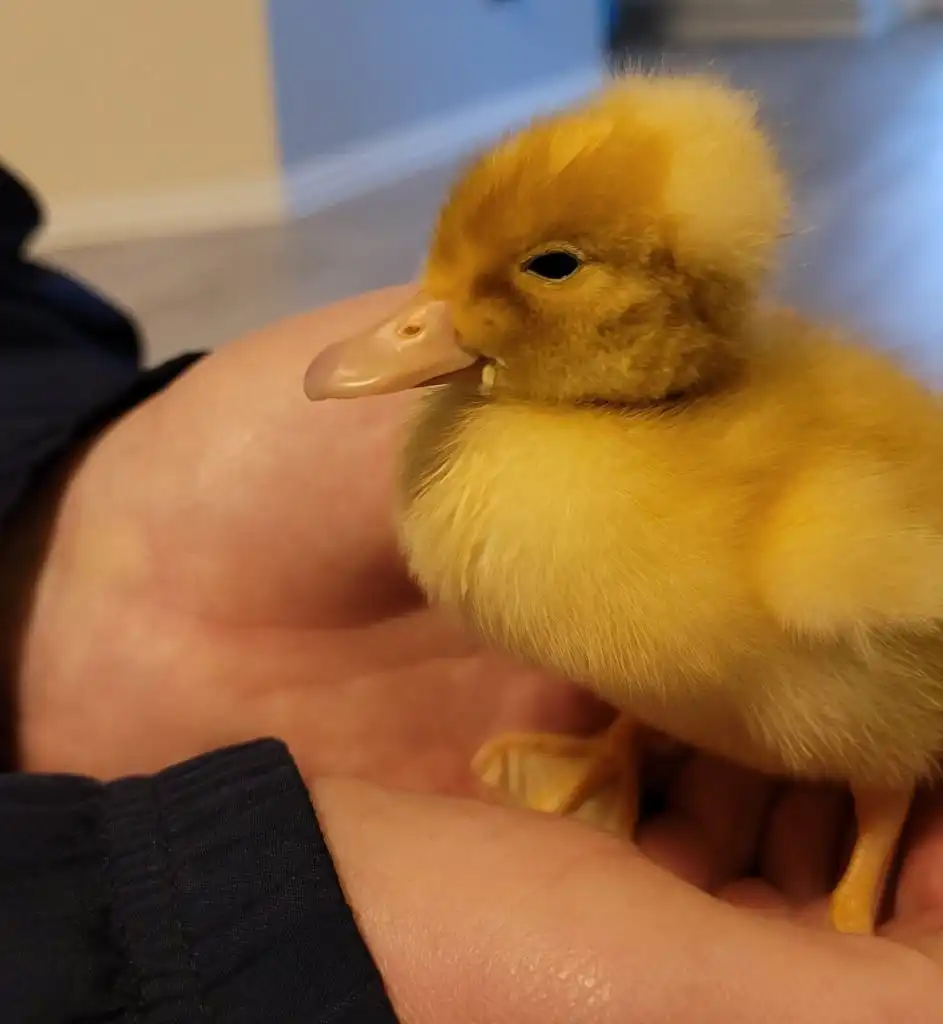
Caring for Newly Hatched Ducklings
Congratulations! Your ducklings have hatched! But the journey doesn’t stop here—proper care in the first few weeks is critical to their health and development. Whether your ducklings were incubator-hatched or hatched under a broody duck, they need warmth, nutrition, hydration, and a safe environment to thrive.
1. First 24 Hours: Letting Ducklings Rest
Newly hatched ducklings are wet, wobbly, and exhausted from the hatching process. They don’t need food or water immediately because they still absorb nutrients from their yolk sac.
What to Expect in the First 24 Hours
✅ Ducklings will rest and sleep frequently.
✅ They may be unsteady on their feet at first.
✅ Their feathers will dry and fluff up over time.
Keeping Ducklings Warm
- Incubator hatchlings: Leave them in the incubator for 12-24 hours until dry and fluffy.
- Broody duck hatchlings: The mother hen will keep them warm, but make sure she has access to food and water.
🚨 Do NOT force a duckling to eat or drink right away. They do not need food immediately because they still absorb nutrients from the yolk sac. Forcing them to eat or drink too soon can cause unnecessary stress and digestive issues. Instead, provide a warm, quiet environment and allow them to rest. Once they are ready, they will naturally start showing interest in food and water.
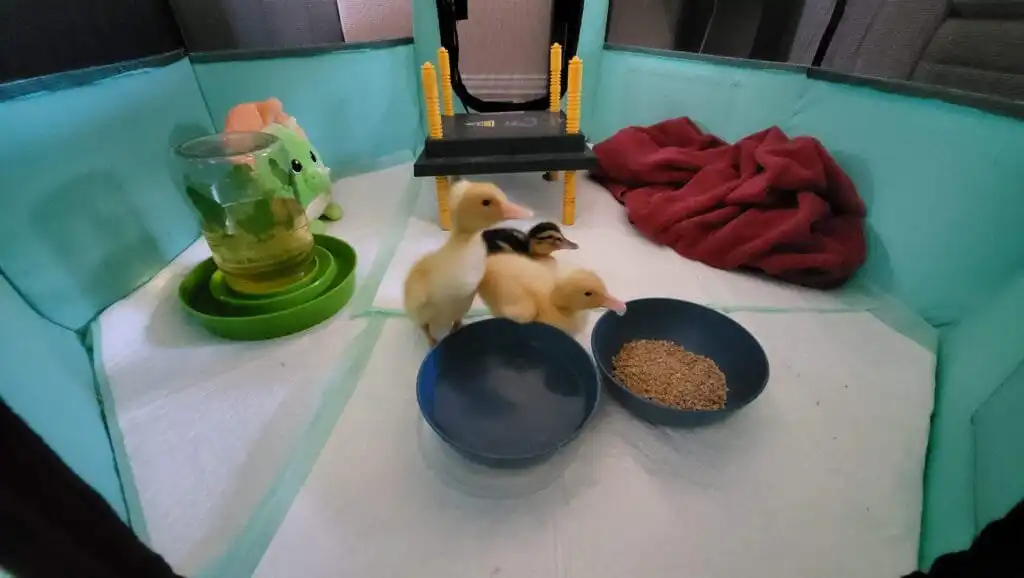
2. Setting Up a Brooder for Ducklings
If you are raising ducklings without a mother, they need a safe brooder setup for warmth and protection.
Brooder Setup Essentials
| Item | Details |
|---|---|
| Temperature Source | A heat lamp or heating plate set at 90-95°F (32-35°C) for the first week. |
| Bedding | Use puppy pads, towels, or pine shavings for the first few days. Avoid slippery surfaces (e.g., newspaper). |
| Space | Minimum 1 square foot per duckling, increasing as they grow. |
| Water | Shallow bowl with marbles or rocks to prevent drowning. |
| Food | Starter crumble (non-medicated) high in niacin. |
Heat & Temperature Guide for Ducklings
Ducklings cannot regulate their body temperature at first, so proper heat is essential.
| Age | Temperature Needed |
|---|---|
| 0-1 week | 90-95°F (32-35°C) |
| 1-2 weeks | 85-90°F (29-32°C) |
| 2-3 weeks | 80-85°F (27-29°C) |
| 3-4 weeks | 75-80°F (24-27°C) |
| 4+ weeks | Reduce heat gradually until fully feathered (~8 weeks). |
Signs Ducklings Are Too Hot or Cold
🔥 Too Hot: Panting, avoiding heat source, wings spread.
❄️ Too Cold: Huddling, loud peeping, not moving much.
3. Feeding & Watering Baby Ducklings
First Food for Ducklings
Ducklings should start eating within 24 hours of hatching. Their first food should be a high-protein, nutrient-rich starter crumble.
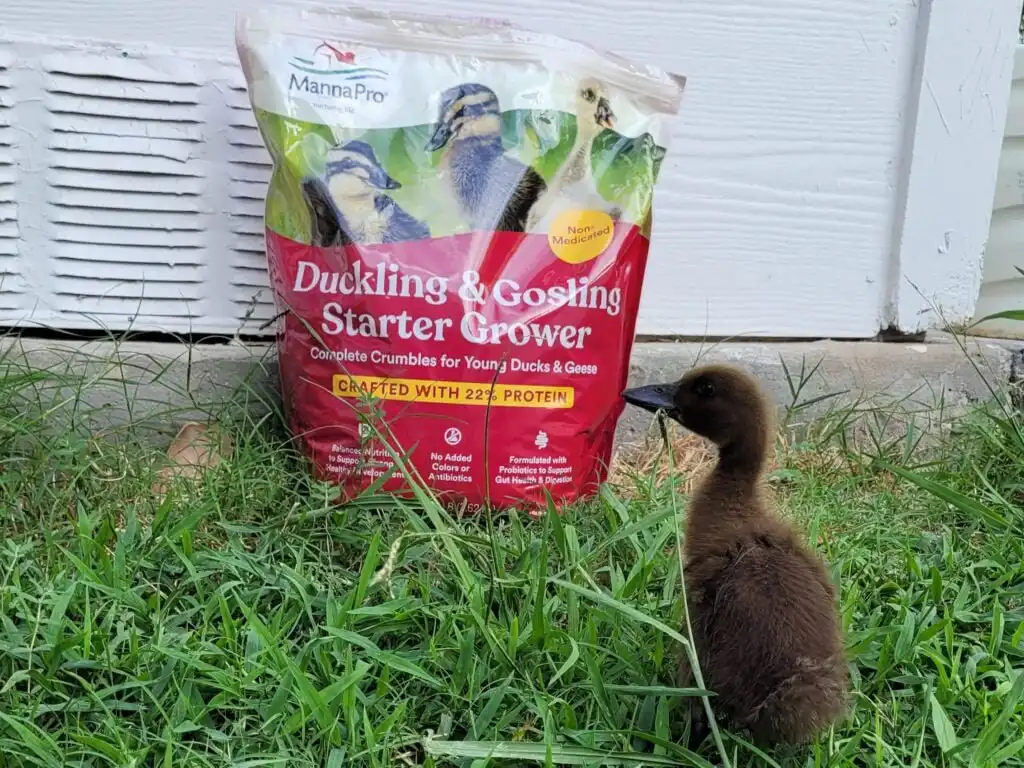
| Feed Type | Protein % | Notes |
|---|---|---|
| Duck Starter Crumble | 20-22% | Best option, balanced for ducklings. |
| Chick Starter (Non-Medicated) | 20-22% | Requires extra niacin for proper leg growth and development. |
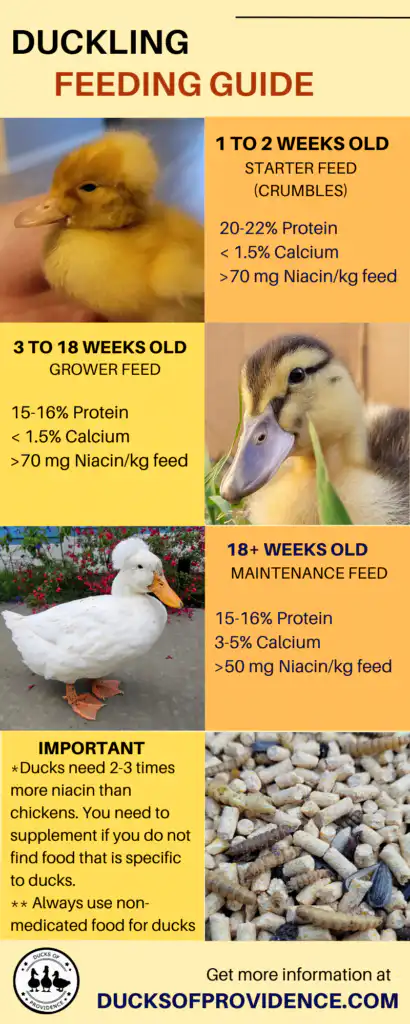
🚨 Avoid medicated chick starter! It contains amprolium, which ducks don’t need.
Niacin (Vitamin B3) for Healthy Growth
Ducklings require more niacin than chicks to develop strong legs. If feeding chick starter, supplement with niacin to prevent leg deformities.
How to Provide Niacin
✅ Brewer’s yeast: Add 1 tablespoon per cup of feed.
✅ Niacin supplement: 100-150 mg per gallon of drinking water.
✅ Niacin-rich foods: Peas, sweet potatoes, fish, eggs.
Water: The Most Important Element
Ducklings drink a lot and need constant access to clean water. They also love to splash, but they can drown easily if the water is too deep.
✅ Use shallow bowls with marbles or pebbles to prevent drowning.
✅ Change water frequently—ducklings make a mess!
✅ Do not let them swim until they are fully dry and strong.
🚨 Choking Risk: Ducklings should always have water available when eating to prevent choking. But use a shallow water bowl as ducklings can easily drown.

4. Socialization & Handling
Ducklings are highly social and need companionship. If raising a single duckling, consider getting a mirror or stuffed animal to prevent loneliness.
Handling Tips
🐥 Be gentle—ducklings are fragile.
🐥 Support their body when picking them up.
🐥 Handle them daily to build trust.
🚨 Avoid excessive stress! Scared ducklings may imprint poorly or struggle to eat.
5. When Can Ducklings Go Outside?
Ducklings love the outdoors, but they need to be fully feathered (6-8 weeks old) before living outside permanently.
🌱 First outdoor trips: Supervised playtime after 1-2 weeks (weather permitting).
🌱 Full transition: After 6-8 weeks, depending on weather and predator protection.
6. Common Health Issues & Prevention
| Issue | Cause | Solution |
|---|---|---|
| Splayed Leg | Slippery bedding, lack of niacin | Use textured bedding, supplement niacin. |
| Pasty Butt | Poop blocking vent (rare in ducks) | Wipe gently with warm water. |
| Dehydration | Lack of water, heat too high | Always provide fresh water, check temperature. |
| Leg Weakness | Niacin deficiency | Supplement niacin in feed or water. |
| Drowning | Water too deep | Use shallow dishes with pebbles. |
Raising ducklings is a fun and rewarding experience, but their early care is crucial for a healthy start. By providing the right brooder setup, warmth, nutrition, and water, you’ll set them up for a happy and successful life!
Freebie: Duckling Care Checklist
Further Reading & Resources
- How to Raise Ducklings: A Beginners Guide
- Spring Coop Prep for Ducklings: Bedding, Smell, and the Brooder to Coop Transition
- The Importance of Niacin for Ducks: What Every Duck Keeper Should Know
- What do Pet Ducks Eat? A Guide to a Healthy and Nutritious Pet Duck Diet
- Keeping Ducks: A Beginner’s Guide
- 16 Common Duck Health Conditions You Should Know About
- Male vs Female Ducks Explained: From Bills to Behaviors
- How Old Is My Duck in Human Years? A Guide to Duck Life Stages
Master the basics of evidence-based care. Explore the full Beginner’s Handbook to build a strong foundation for your flock.