
Our New Duck Shed: How We Built an 8×8 ft Shed and Turned It Into the Perfect Duck House
Last updated: March 21st, 2026
To keep our research-backed guides free, this site uses ads and affiliate links (earning a small commission at no cost to you). Everything here is created by a duck mom and PhD scientist, combining academic rigor with hands-on experience to provide practical, trustworthy advice for duck keepers everywhere. 🦆 Learn more
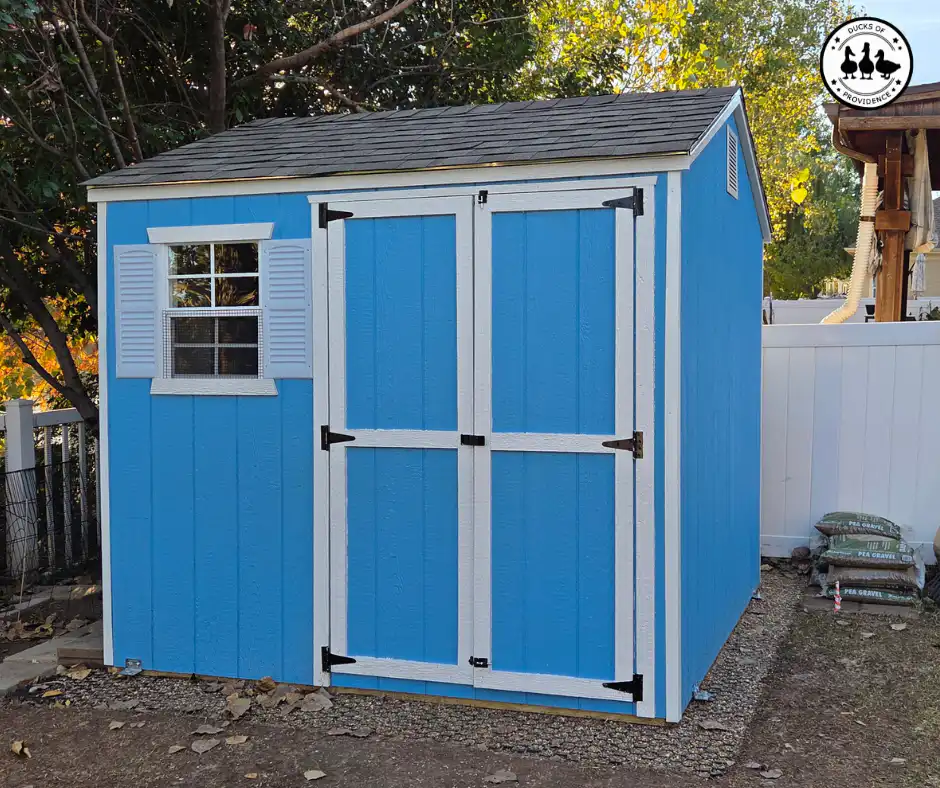
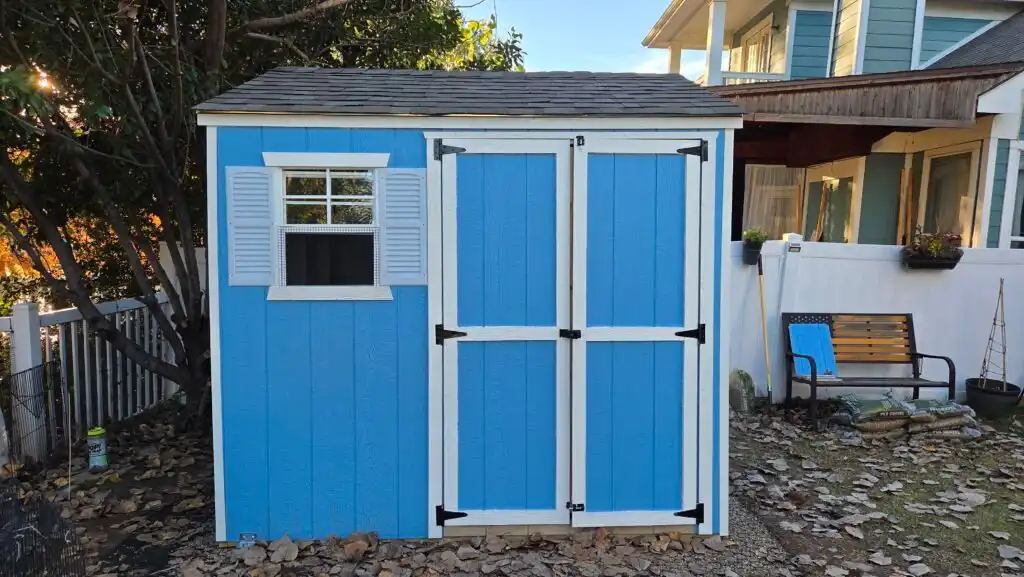
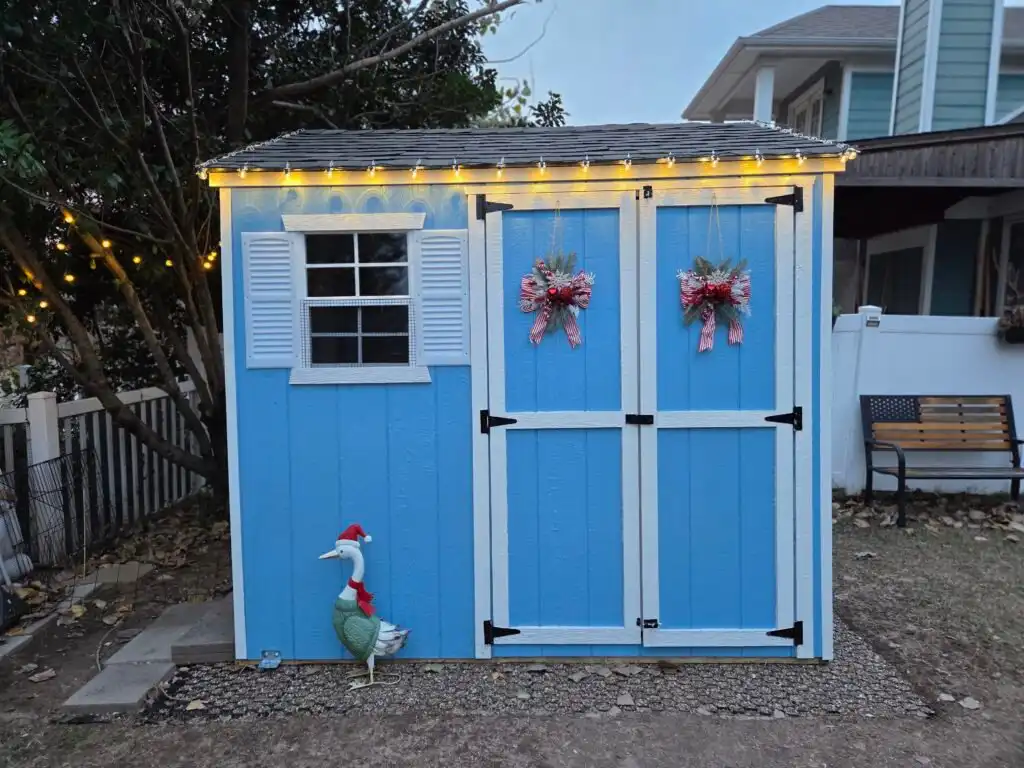
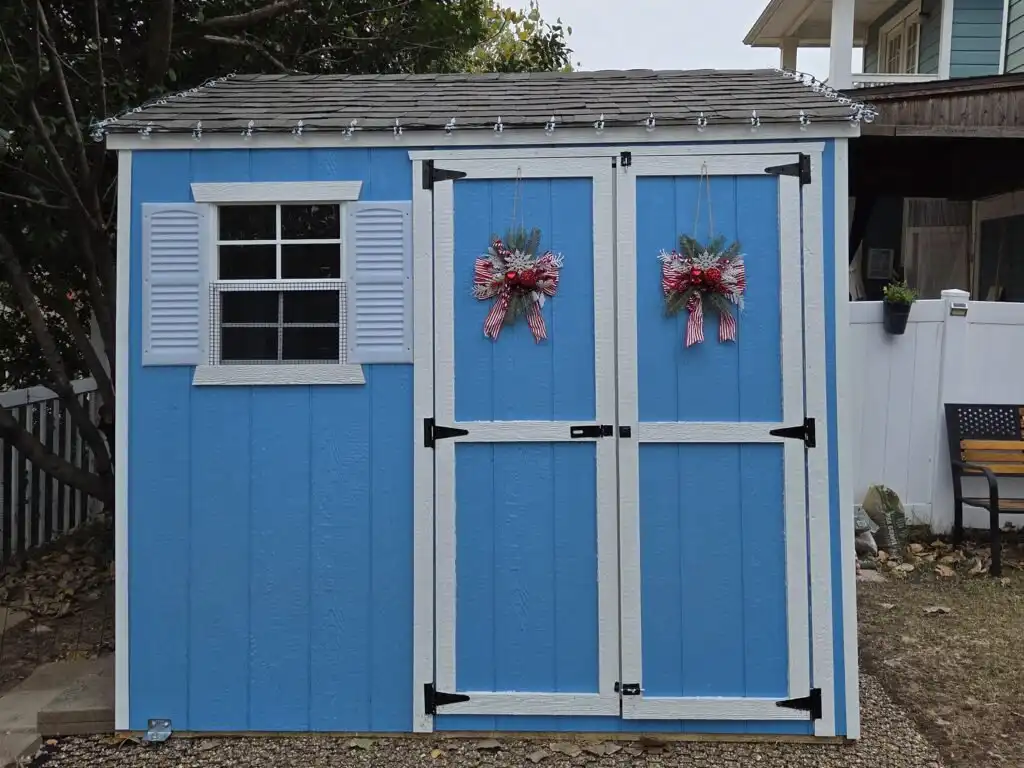
For years, I dreamed of giving my flock a large, comfortable, and truly weather-ready sleeping space. We’ve built two duck houses before, both functional, both loved, but nothing compares to what we created this fall. Our brand-new 8×8 ft duck shed is everything I hoped for, and more: spacious, sturdy, easy to clean, and designed from the ground up with duck needs in mind. And yes, it also happens to look adorable in our yard, like a miniature version of our own house.
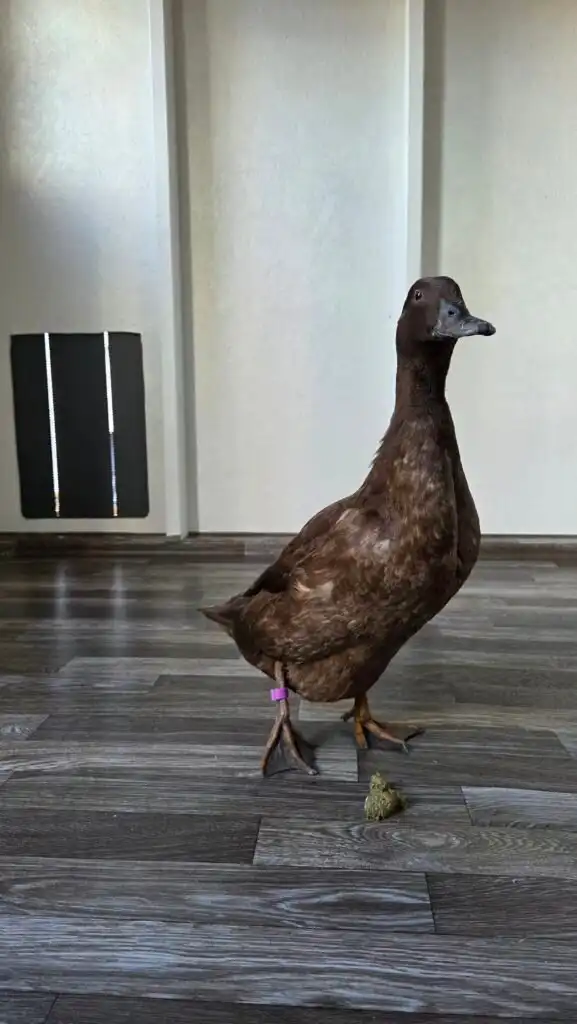
As we worked on it over several weekends, the flock supervised closely. Krümel peeked around corners. Penny and Schnatterinchen inspected the gravel. Simon quacked complaints whenever we used power tools during nap time. But in the end, they approved enthusiastically.
Part of the Housing & Environment Hub, Engineering safe, bio-appropriate habitats for backyard flocks.
Quick Navigation: Jump to a Section
[hide]
Why a Duck Shed Was My Long-Time Dream
Duck parents quickly learn that nighttime comfort matters more than most people realize. Ducks may spend their days exploring, splashing, and foraging, but nights are when they settle, rest, and recharge. They need plenty of space to stretch their wings, preen without bumping into one another, and relax without feeling crowded. A good guideline is at least 4 to 6 square feet of indoor space per duck, and over the years, I’ve learned that giving them a bit more always makes for calmer, happier birds.
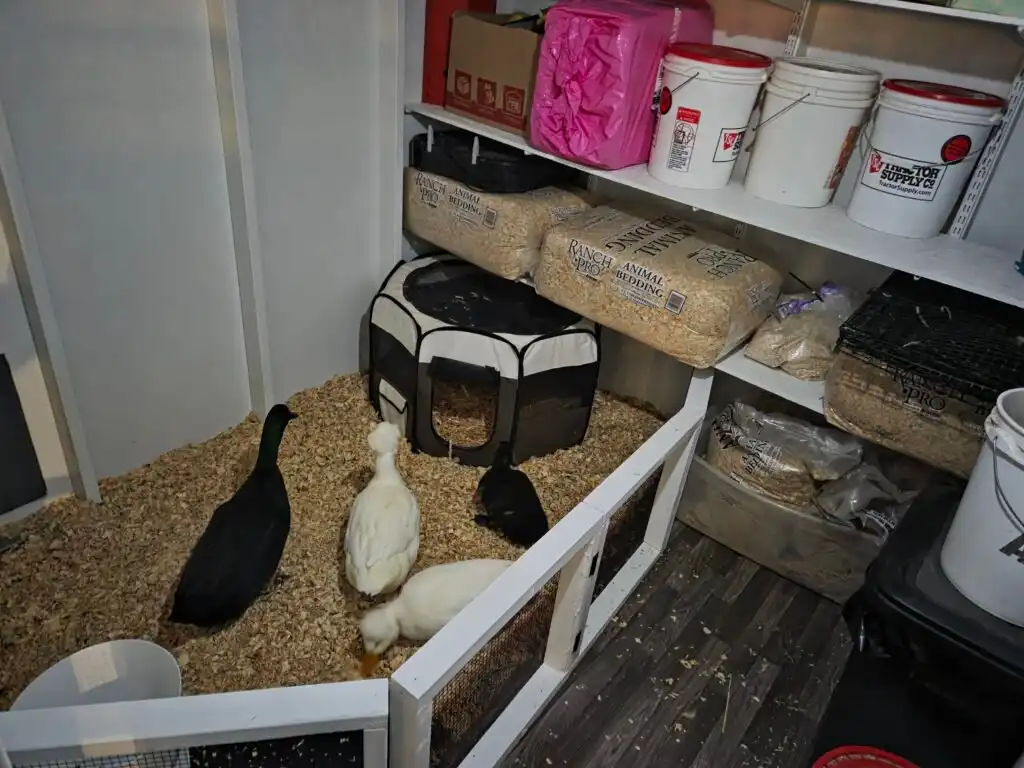
When we first planned this shed, our flock still had eight ducks. The spacious 8×8 ft layout was designed with that full group in mind. But with the recent loss of Hertha and Penny, our nighttime flock is now smaller. These days, four ducks sleep in the shed regularly, while Krümel and Muffin continue to sleep inside our house as our little “spoiled” indoor ducks. Even with this arrangement, we knew we wanted the space inside the duck shed to be practical for both flock care and daily use, so we built a sturdy separator down the middle of the structure.
The ducks now have a bit over half the interior, about 4.5 × 8 ft, as their dedicated nighttime living area. The remaining portion belongs to us for easy entry, storage access, and cleaning. This setup keeps the duck shed organized, safe, and functional. And truly, even this reduced area gives the ducks more than enough space for sleeping, stretching, and settling comfortably. Once the run extension is complete, the shed will also be open to them during the day, so they can come and go as they please. I already know Krümel and Muffin, our spoiled house ducks, will be sneaking in for cozy midday naps the moment we open it up.
Another major reason this shed has been a long-time dream of mine is predator safety. Living in an area where bobcats occasionally wander through the yard, having a solid, well-built nighttime shelter is essential. No matter how many years I’ve kept ducks, I never take their safety for granted. Knowing they sleep inside secure walls, behind an automatic coop door, brings me a peace of mind that smaller coops could never fully give.
Winter weather was also a huge motivation. In the past, prolonged cold spells often meant we moved the ducks into the garage at night, just to keep them warm and out of drafts. It worked, but it wasn’t ideal for anyone. With the new duckshed, insulated, well-ventilated, and soon equipped with a safe hot plate for cold months, those garage moves may not be necessary anymore. And in summer, a fan will help keep air flowing for maximum comfort.
This duck shed represents the culmination of four years of learning what ducks truly need: space, ventilation, safety, and stability. Now I never have to wonder whether they have enough room or whether the airflow is right. They finally have a home that feels as thoughtfully designed as the rest of their environment.
And best of all, it looks charming in the yard. We matched the paint to our house and used the same shingles, so the shed feels like a miniature cottage tucked into the corner, one that quietly shelters a flock we love dearly. Every time I look at it, I’m reminded not just of the work we put in, but of the comfort and security it gives our ducks every single night.
Duck-Friendly Modifications Inside the Shed
We wanted this to be a lasting, functional home for the flock, not just a shed with a few duck features added on. So from the very beginning, we made design choices with duck behavior, cleanliness, ventilation, and long-term durability in mind. Every upgrade we added was guided by a mix of experience, research, and the realities of daily duck care.
Wipeable Painted Walls
The entire interior is coated with a high-quality, wipeable paint, something I now consider essential for any duck house. Ducks splash water everywhere. It’s simply part of who they are. Because we provide our ducks with water during the night (more on this below), we expect even more moisture in the air and a bit of nighttime mess around their bowl. Add in the humid breath, the feather shakes after a good drink, and yes, the occasional poop that somehow ends up on the wall, and you can imagine how quickly untreated wood would start to suffer.
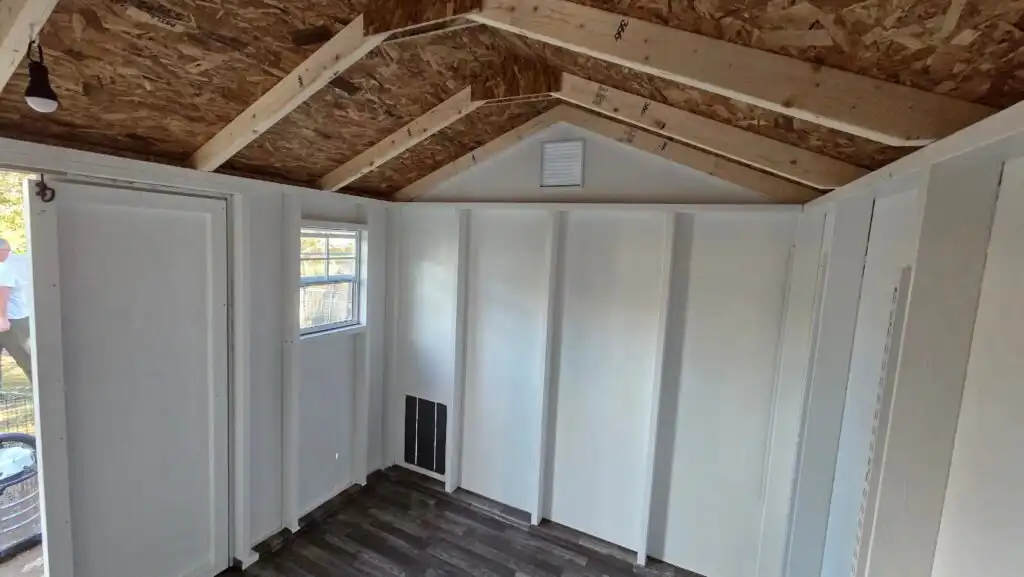
Using wipeable paint creates a smooth, sealed surface that lets us clean up splashes, drips, and stray poops in seconds. It also prevents moisture from soaking into the walls, reducing the risks of mold, staining, and rot. This simple upgrade not only keeps the duck shed looking fresh but also helps protect the structure for the long term. It’s one of those small decisions that pays off every single day, especially in a space shared with ducks who never fail to keep things interesting.
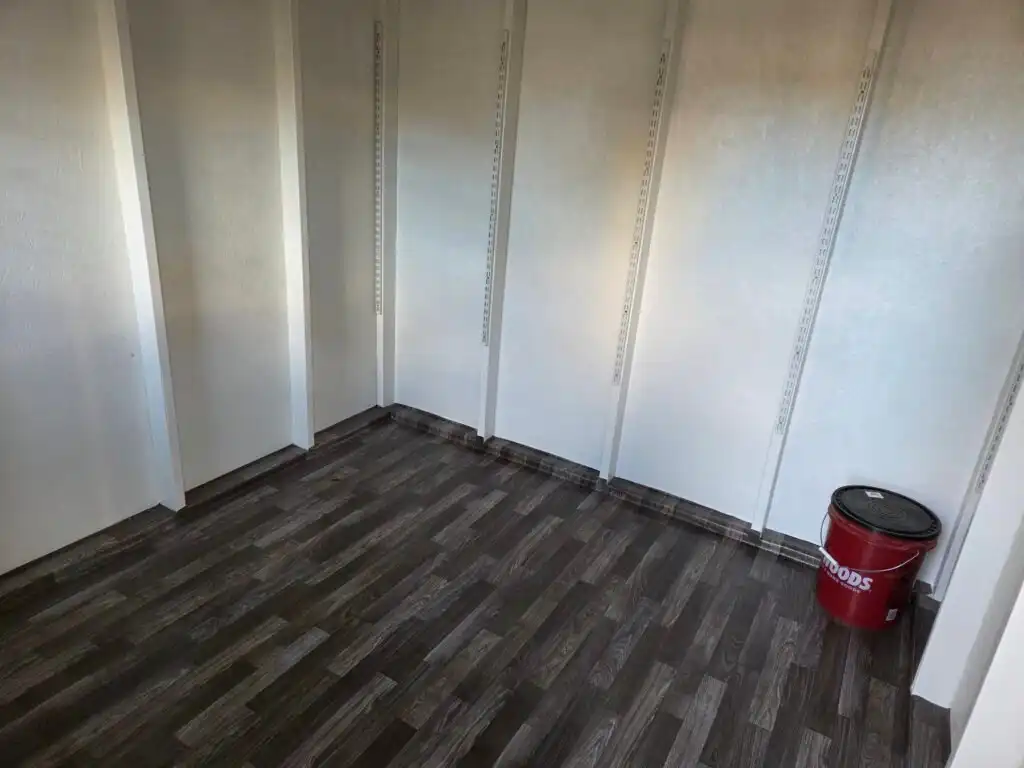
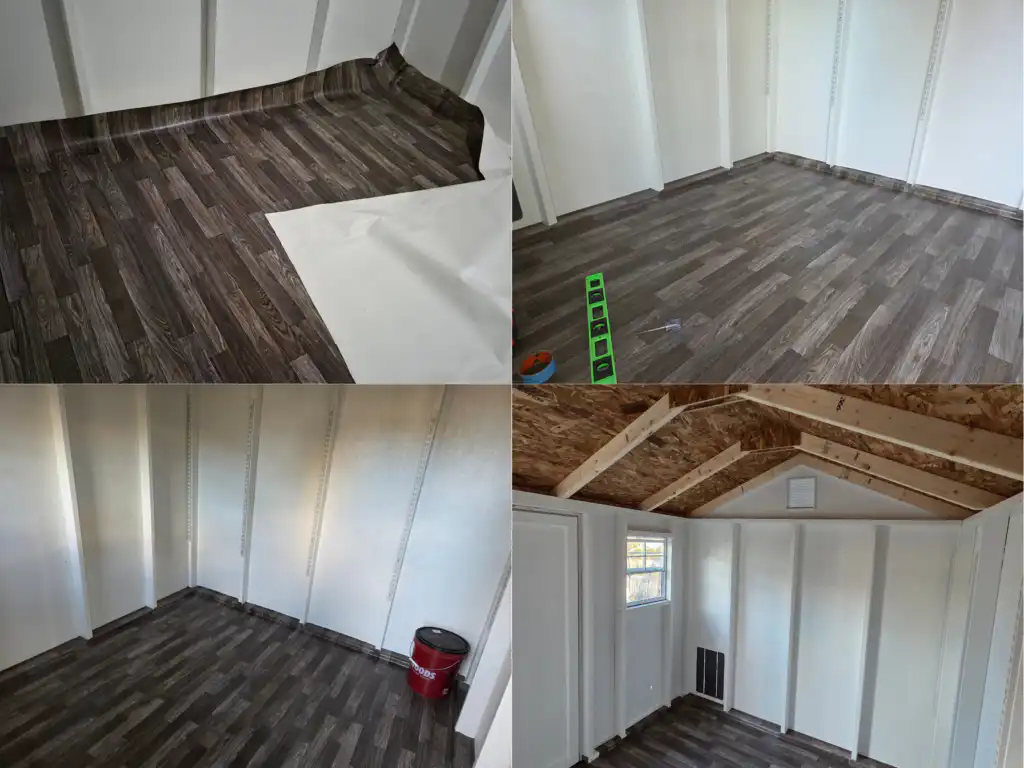
Sheet Vinyl Flooring (Slightly Up the Walls!)
The vinyl flooring might be one of my favorite upgrades because of how dramatically it improves cleanliness. Vinyl is waterproof, durable, and incredibly easy to maintain. A quick sweep and wipe leaves it looking new again.
But the real game-changer is that we installed the vinyl not just on the floor, but a few inches up the walls as well. This creates a smooth, continuous surface, almost like a low backsplash, that prevents water or poop from seeping into seams. Ducks love to splash, drink, and rinse their bills, so this small detail keeps moisture contained and protects the structure underneath. It also helps with deep cleaning days, when a bit more water inevitably gets involved.
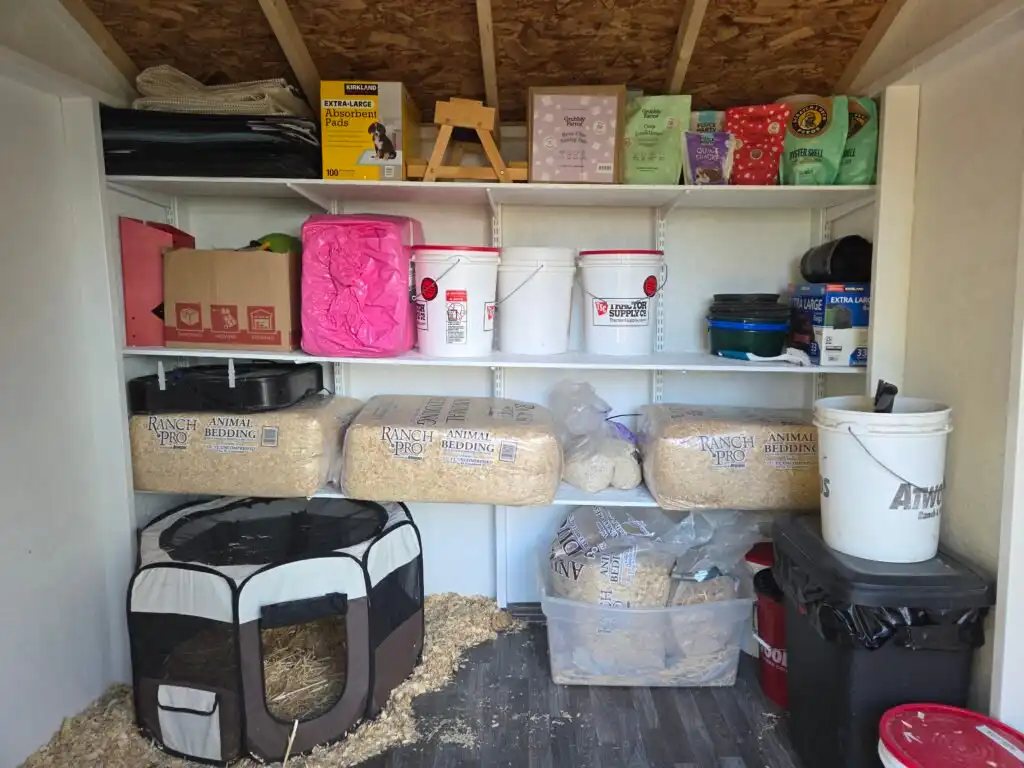
Built-In Shelves for All the Duck Essentials
One thing every duck parent learns fast: ducks come with a lot of gear. Bedding, feed, oyster shells, medical kits, cleaning supplies, toys, seasonal accessories… and somehow the collection keeps growing.
To keep everything organized and accessible, we built a set of sturdy shelves along the back wall of the shed. We decided to use a dual-track upright wall shelving system so that we are flexible. It feels wonderful to finally have one dedicated place for all our duck supplies, instead of scattering them through the garage or inside the house. With the new setup, everything we need is right there in the duck shed, easy to reach during morning and evening routines. And yes, having our garage back is a very welcome bonus!
Lighting and Monitoring
Proper lighting makes a surprisingly big difference in duck care. We installed a simple but effective lighting system that is bright enough for us to clean and check on the flock in the evenings, yet gentle enough that it doesn’t disturb their natural nighttime rhythm.
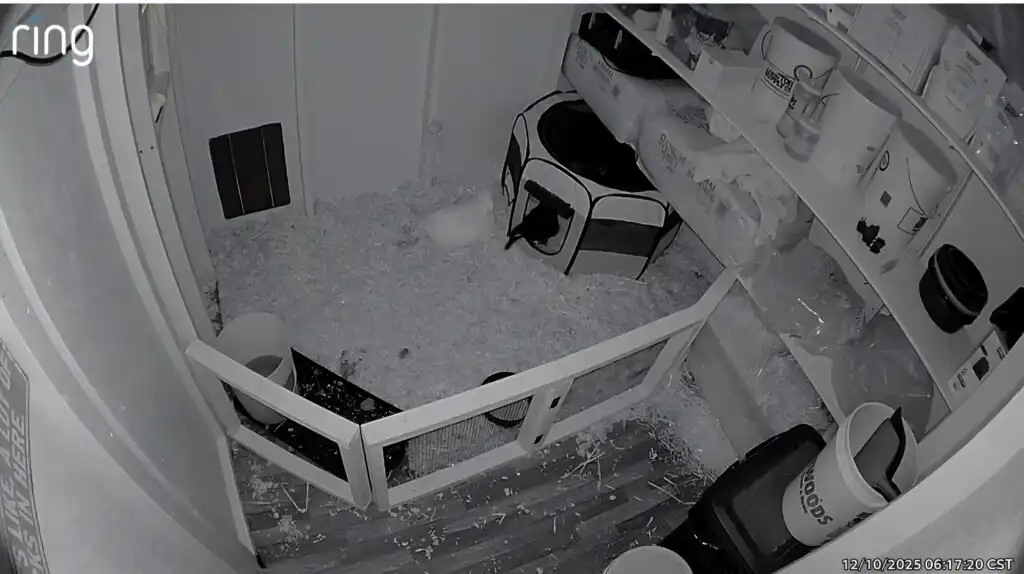
We also installed a Ring camera inside. This gives us peace of mind, especially with our local predators and unpredictable Texas weather. Being able to peek in remotely to make sure everyone is settled, safe, and quiet has already proven invaluable. It also helps us monitor behavior changes. A subtle shift at night can sometimes be an early sign that a duck isn’t feeling well.

Proper Ventilation
Ventilation is one of the most important parts of any duck house, and something many first-time keepers don’t realize they need until humidity becomes a problem. Ducks naturally produce a lot of moisture through their breath, droppings, and water play. Without ventilation, that moisture can build up quickly and lead to damp bedding, poor air quality, and respiratory issues.
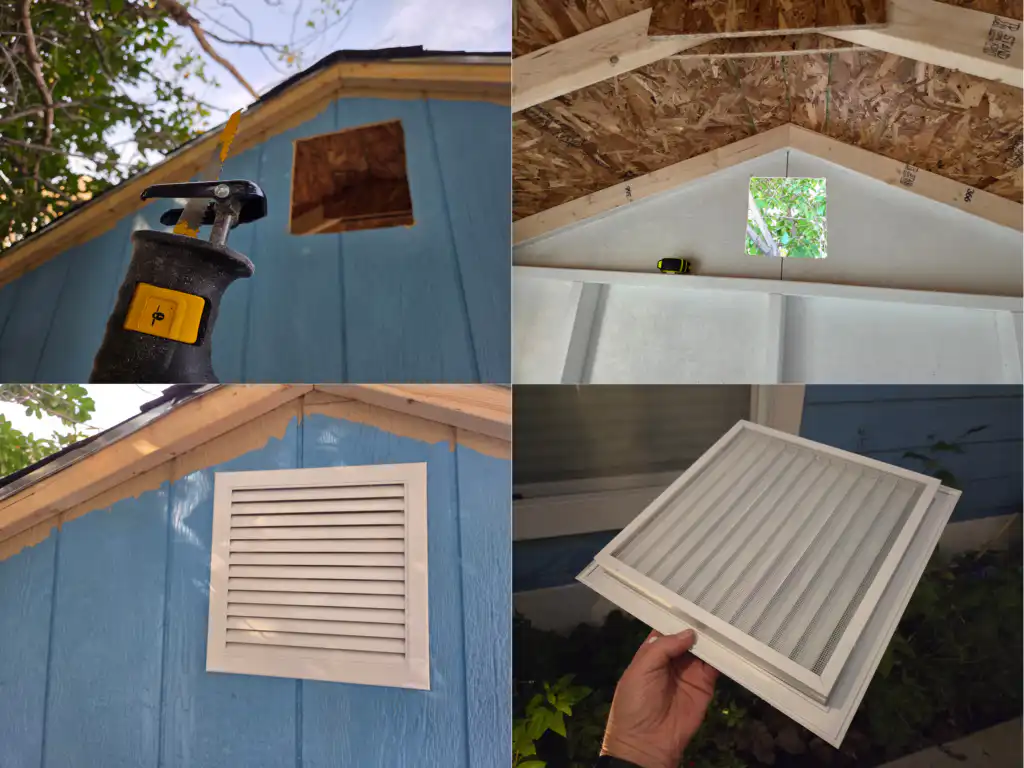
To prevent this, we added two gable vents that allow warm, moist air to rise and escape the shed. On the inside, the openings are covered with a sturdy metal mesh, so insects and rodents can’t get in while fresh air can still flow freely. These vents will be especially helpful in summer, reducing heat buildup and improving circulation, but they benefit the duck shed year-round.
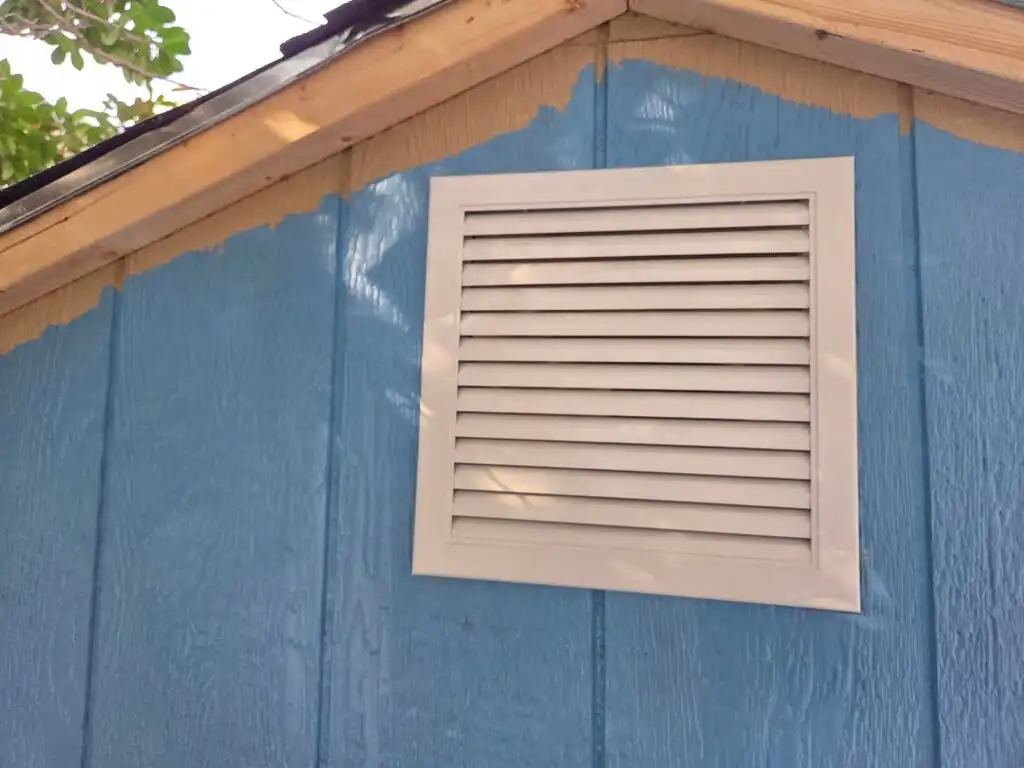
Good ventilation keeps the interior dry, reduces ammonia odors, and creates a healthier and more comfortable environment for the flock.
Automatic Coop Door
One feature I never want to live without again is our Run Chicken automatic coop door (save 15% with our link and code providence15). We chose the giant size so the ducks have plenty of room to waddle through comfortably. The door can be programmed to open and close on a schedule, or it can be controlled manually through an app on my phone, something I appreciate more than I ever expected.
Unlike chickens, ducks do not reliably put themselves to bed at sunset. Part of our nightly rhythm is that I bring them into the shed myself. It’s our little routine: I check that everyone is healthy, accounted for, and settled, and of course they get their bedtime snacks (Grubblies are always a hit). Because I’m already inside with them, I love being able to close the door directly from my phone once everyone is tucked in. No need to walk back around the shed or fumble with latches in the dark.
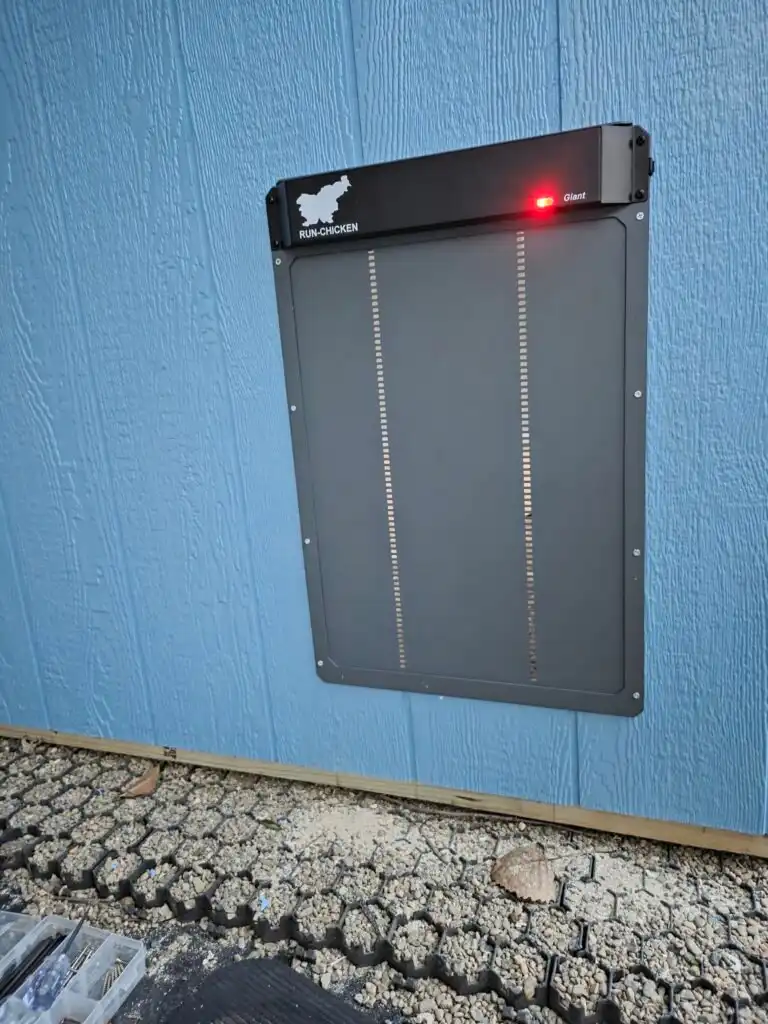
In the mornings, I’m still opening the door manually because the new run extension isn’t finished yet. I want to guide them safely to their daytime run so they are fully protected from predators. But once the expanded run is complete, I’ll finally be able to set the door to open automatically, most likely around 7 a.m., giving the flock the freedom to start their day while keeping everyone safe.
This door adds a level of convenience, flexibility, and security that has already made a meaningful difference in our daily routine, and it’s easily one of my favorite upgrades in the entire duck shed.
Nighttime Water Access
One of the most important features in our duck shed is 24/7 access to water. Ducks are waterfowl, and going 8–12 hours without water would be not only stressful for them, but also unsafe. This isn’t just personal preference. Our avian vet has emphasized that withholding water overnight can lead to dehydration, impacted nares, and difficulty clearing their bills. Ducks use water constantly to rinse food from their mouths, wash debris from their nares, and stay properly hydrated. Unfortunately, many domestic ducks are chronically dehydrated without their owners realizing it, simply because water isn’t offered consistently.
So yes, our flock gets water at night, and always will. Ducks are naturally messy with water, and I accept that wholeheartedly. Providing them with what they need will always matter more to me than avoiding a little extra cleanup.
To manage the splashing inside the shed, we set up a simple but very effective nighttime water station. We use a sturdy bucket with a hole cut in the side, large enough for them to fit their heads and bills through, but not so large that they can step inside or tip it over. The bucket is deep enough for them to fully submerge their heads, which is essential for proper bill and nare care.
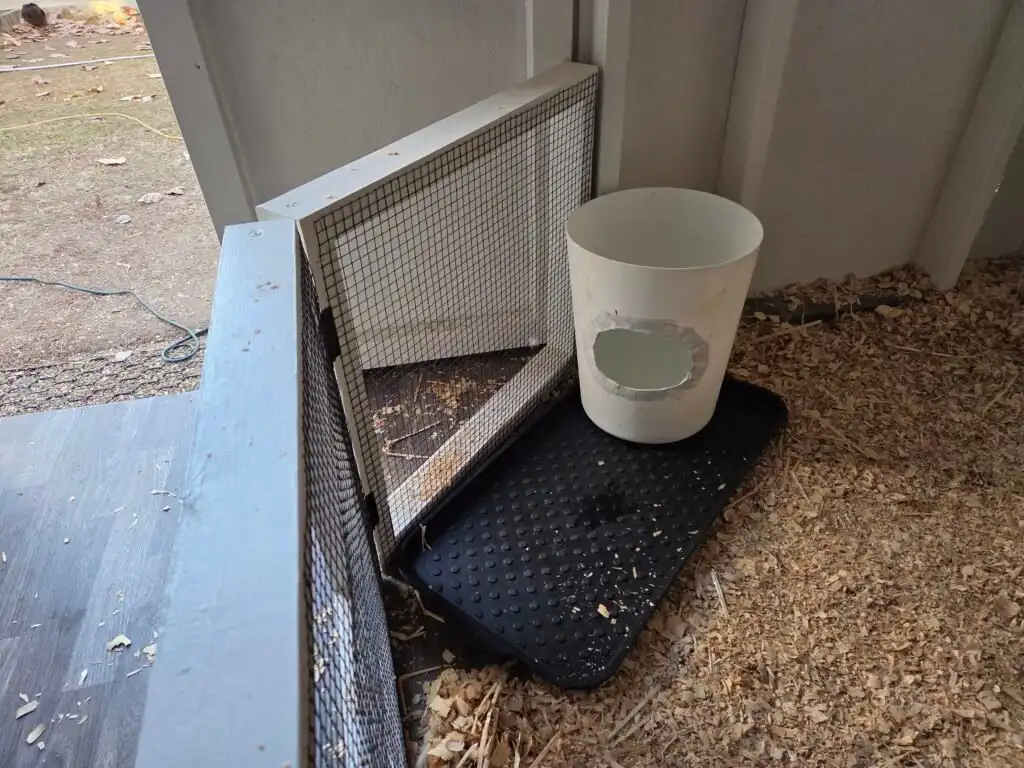
Underneath the bucket, we placed a shoe-style winter tray to catch any spills or overflow. This setup dramatically reduces the mess, keeps the bedding drier, and still gives the ducks full access to the water they need to stay healthy. It has worked beautifully for us, and the flock adapted to it immediately.
Providing nighttime water may mean more cleaning, but for ducks, it’s a matter of comfort and welfare. And to me, that will always be worth the extra effort.
A Few Cute Finishing Touches
Of course, no duck house is complete without a little personality. We couldn’t resist adding Christmas decorations. After all, if the duck shed looks like a tiny cottage, it deserves to feel festive too. A few twinkling touches made the space look so cozy that even the ducks paused to admire it.
We still have a few interior details left to finish. We’ll be hanging small pictures of the flock with their names underneath, turning their shed into a true home. It’s these little touches that make me smile every time I open the door, and I hope the ducks appreciate the effort… at least as much as they appreciate their snacks.

We are also installing a hot plate for the colder months so the house stays comfortable without overheating. And once summer returns, we’ll swap that out for a fan to keep air moving during those hot Texas days. Good ventilation and stable temperatures make such a difference in duck health, so these upgrades help the shed stay functional in every season.
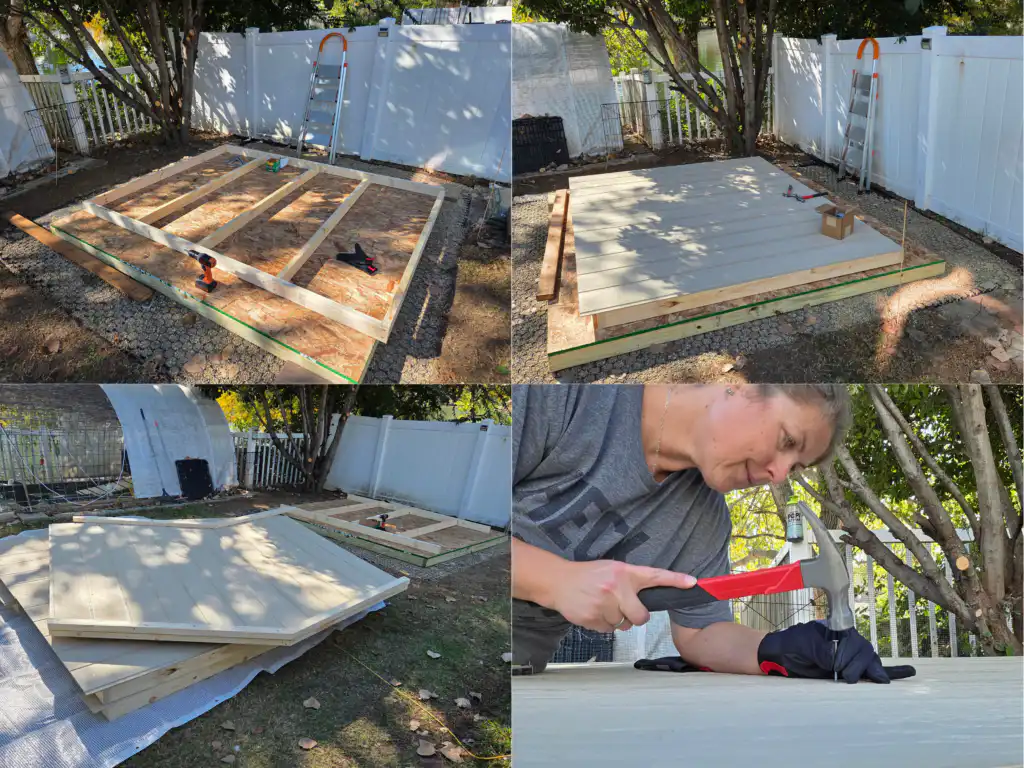
Step-by-Step: How We Built the Shed Base
Before the shed could go up, we needed a solid, well-draining foundation, one that would stay level through Texas storms, daily duck splashing, and years of use. Ducks and mud may be lifelong companions, but duck housing and mud do not mix. A thoughtful base protects the shed, keeps the interior dry, and prevents countless maintenance issues down the road.
Here’s exactly how we built ours:
1. Prepare a 10×10 ft Area for Drainage
Although the shed itself is 8×8 ft, we prepared a 10×10 ft footprint. This extra one-foot buffer around the entire shed helps water drain away from the structure instead of pooling around it. It’s a small detail with a big impact for long-term durability—especially when you have ducks splashing nearby year-round.
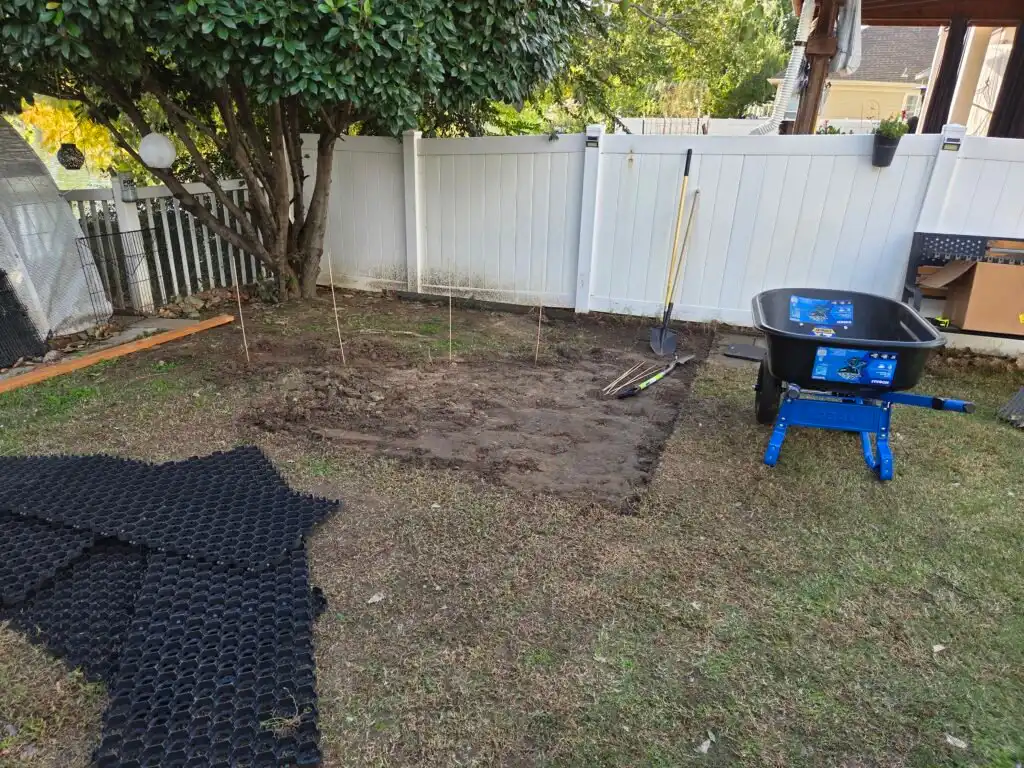
We marked the area, then removed all grass, roots, rocks, and debris until we had a clean, even surface. Taking the time to truly level this base makes every following step much easier.
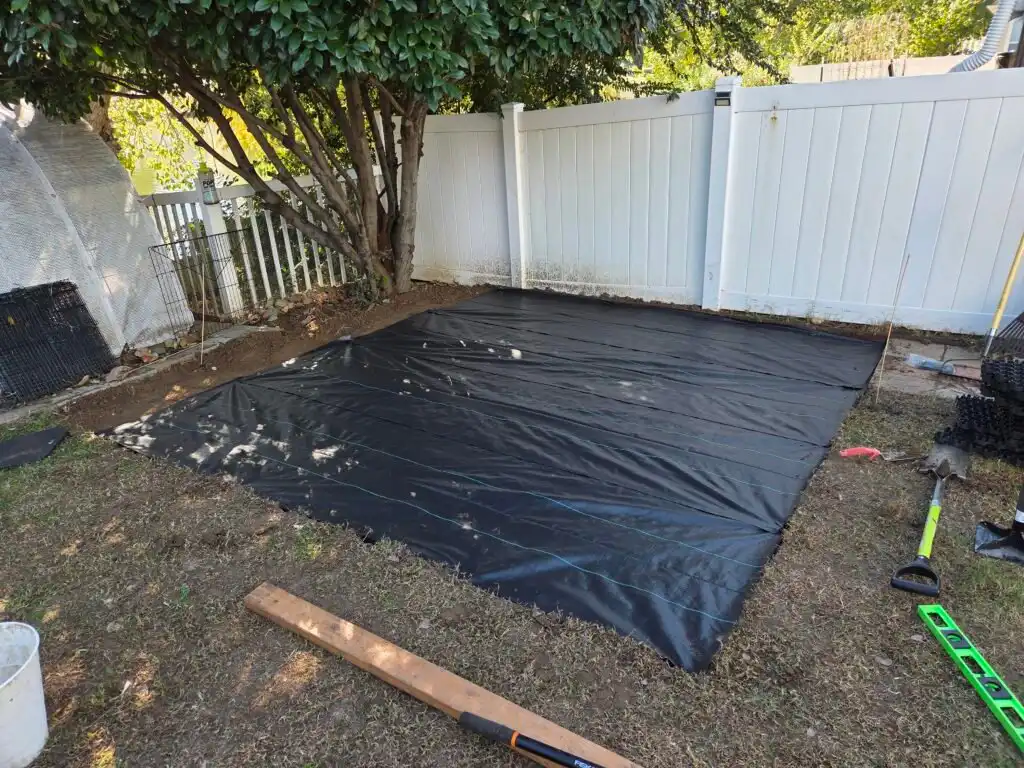
2. Add Landscape Fabric
Once the ground was level, we rolled out landscape fabric across the entire 10×10 ft space. This layer is important: it prevents weeds and grass from growing up underneath the shed and helps keep the gravel clean and stable. It also adds a small but helpful barrier between soil and gravel, which supports drainage and long-term structure.
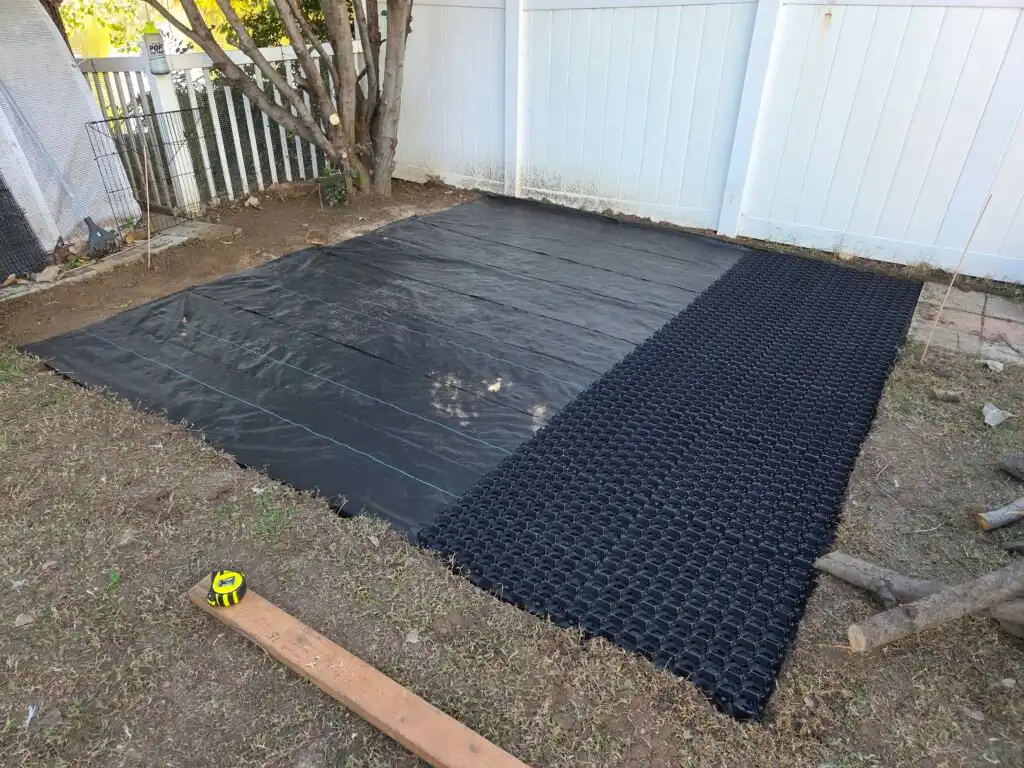
3. Install Ground-Stabilizing Plastic Grids
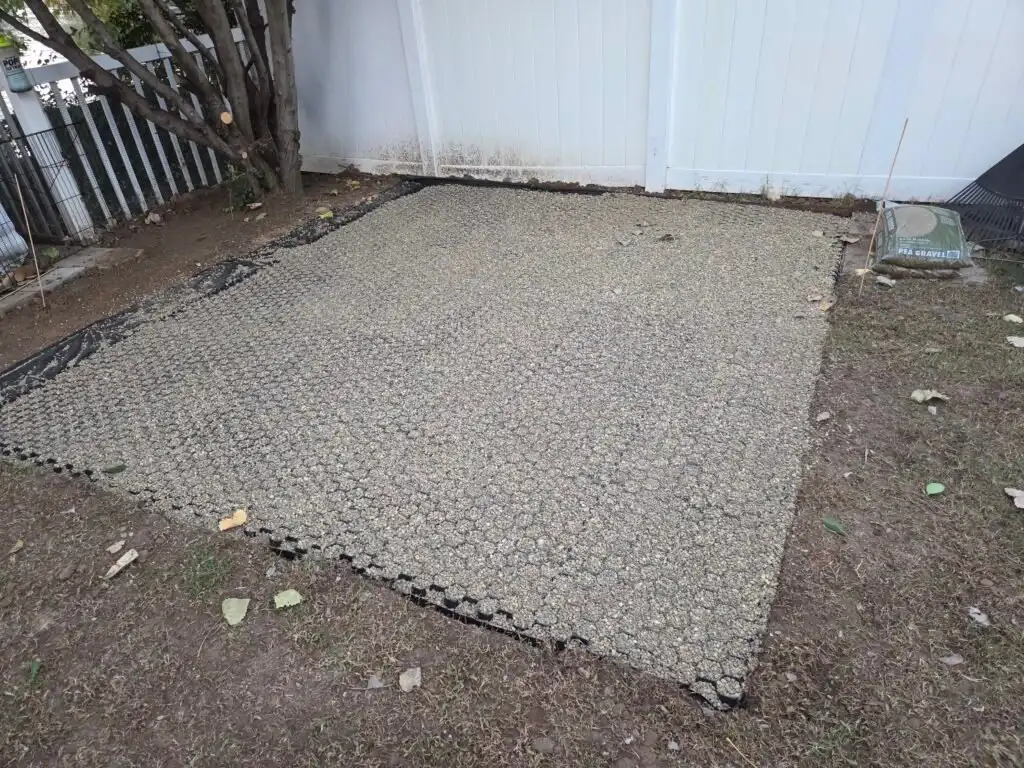
On top of the landscape fabric, we placed plastic ground-stabilizing grids. We used the Vodaland Permeable HexPave System, and we are very happy with it. These grids interlock to create a firm, load-bearing layer that prevents sinking or shifting over time. For a shed that will house ducks, with daily water spills, rainstorms, and frequent cleaning, these grids are a game-changer. They ensure the shed stays level and the gravel stays exactly where it belongs.
4. Fill the Grids With Pea Gravel
Next came the pea gravel. We filled every grid cell and spread the gravel evenly throughout the entire 10×10 area. Pea gravel is excellent for drainage: water moves through it quickly, preventing mud and puddles from forming around the shed. This keeps the entrance dry, reduces the humidity inside, and makes the entire environment more comfortable for both ducks and humans.
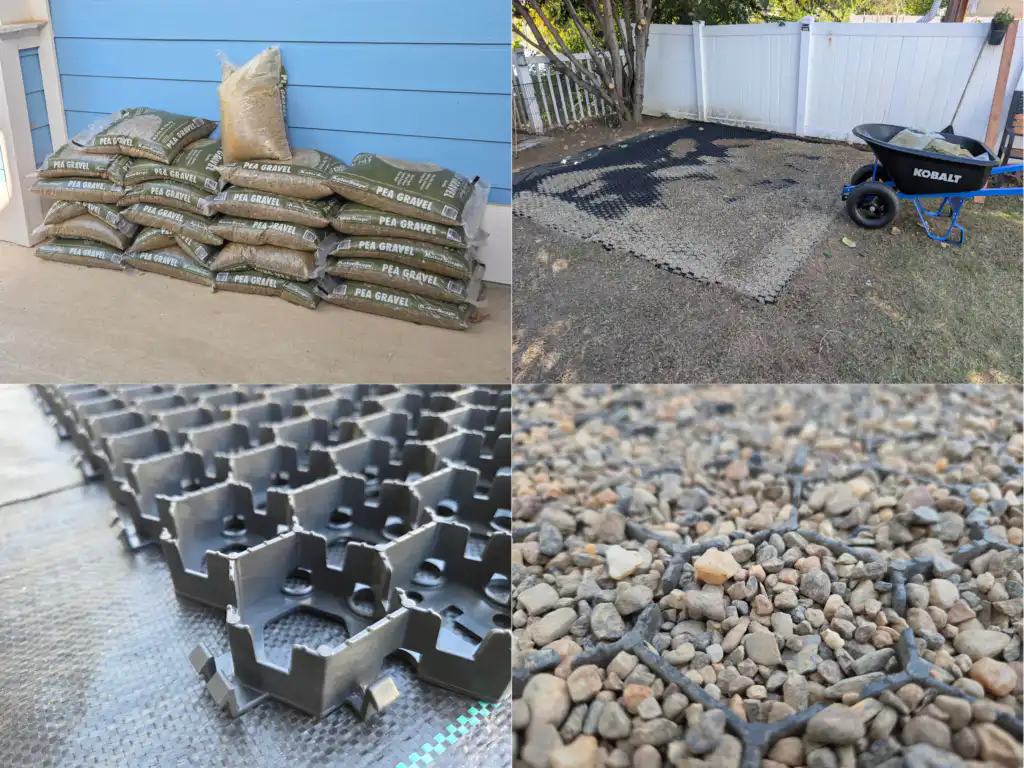
5. Compact and Perfect the Surface
After spreading the gravel, we raked it smooth and used a tamper to compact it firmly. This final pass ensures the surface is level, stable, and ready for shed assembly. A level foundation makes every remaining step, from placing the floor frame to hanging the doors, far more accurate and stress-free.
6. Step Back and Appreciate the Transformation
Even before the shed walls went up, the area already looked cleaner, more functional, and completely transformed. The combination of drainage space, fabric, grids, and gravel created a base that not only supports the shed but also keeps the surrounding yard tidy and mud-free, a true win for any duck keeper.
Assembling the DIY Shed
We chose a pre-cut DIY shed kit from Little Cottage Co, and honestly, it was one of the best decisions we made for this project. As two people who are not professional carpenters, we were a little nervous going in, but the kit made everything straightforward. Every board came pre-cut, labeled, and ready to assemble. The instructions were clear and detailed, and once we got into the rhythm of the build, the whole process felt surprisingly manageable.
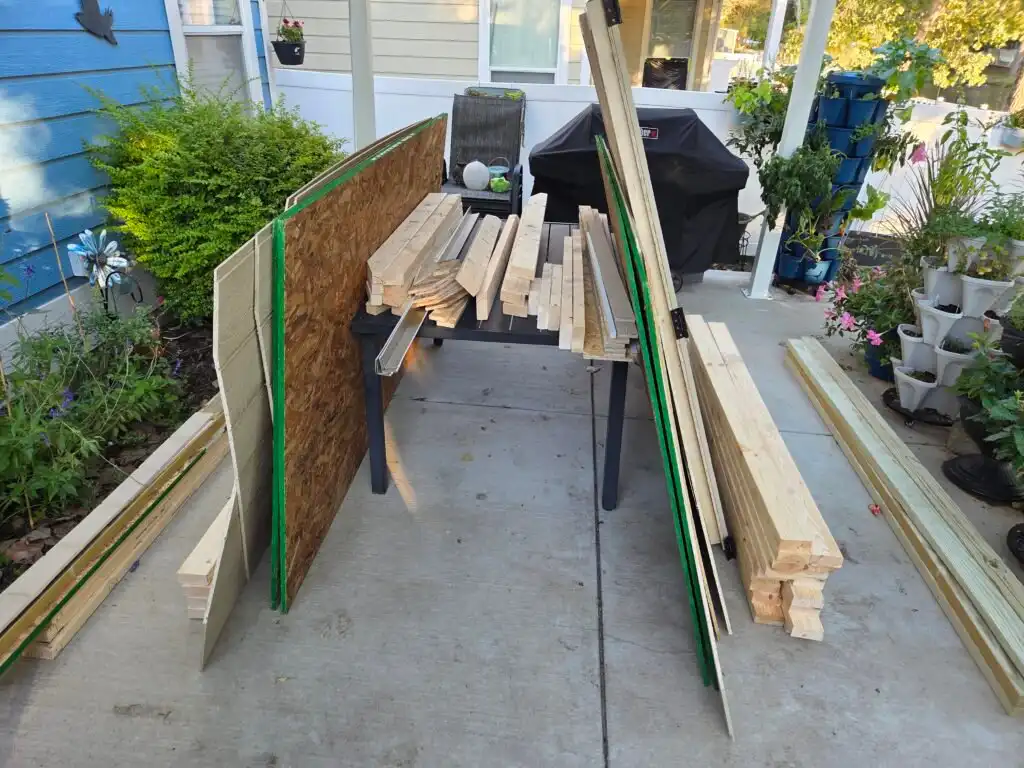
Over the course of a few weekends, fueled by determination, teamwork, and plenty of snack breaks for the supervising ducks, we completed the entire build step by step.
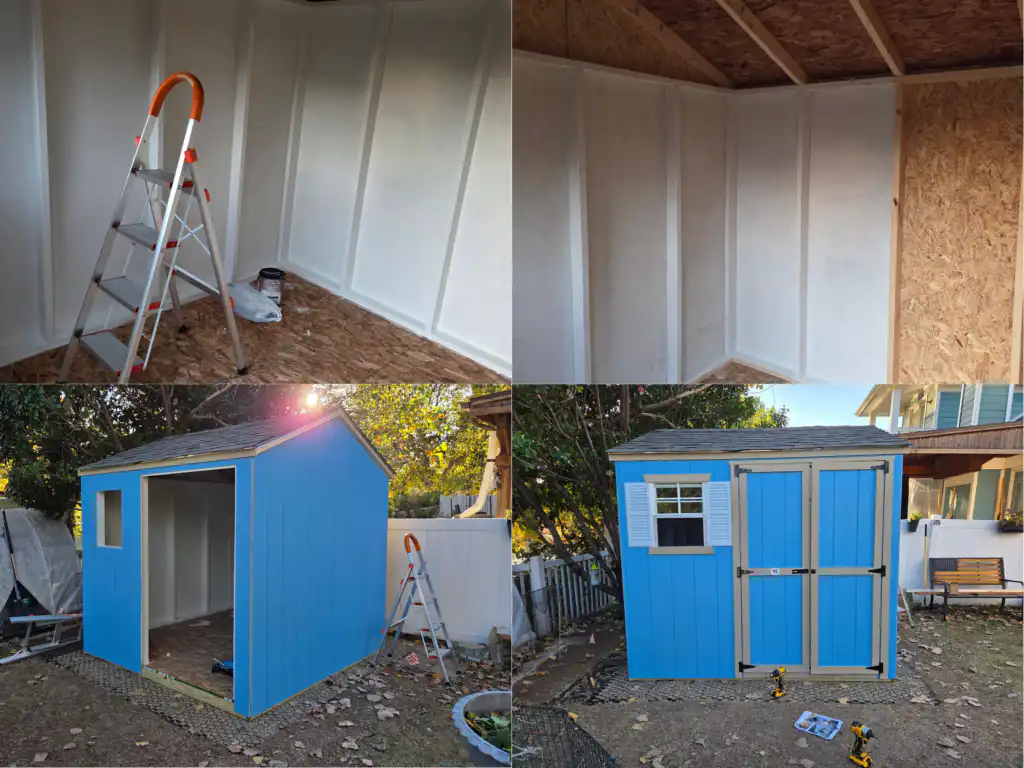
Building the Floor
We started with the floor, assembling the base frame and securing the plywood panels. This step gave us a solid platform to work on and made the shed feel real right from the beginning.
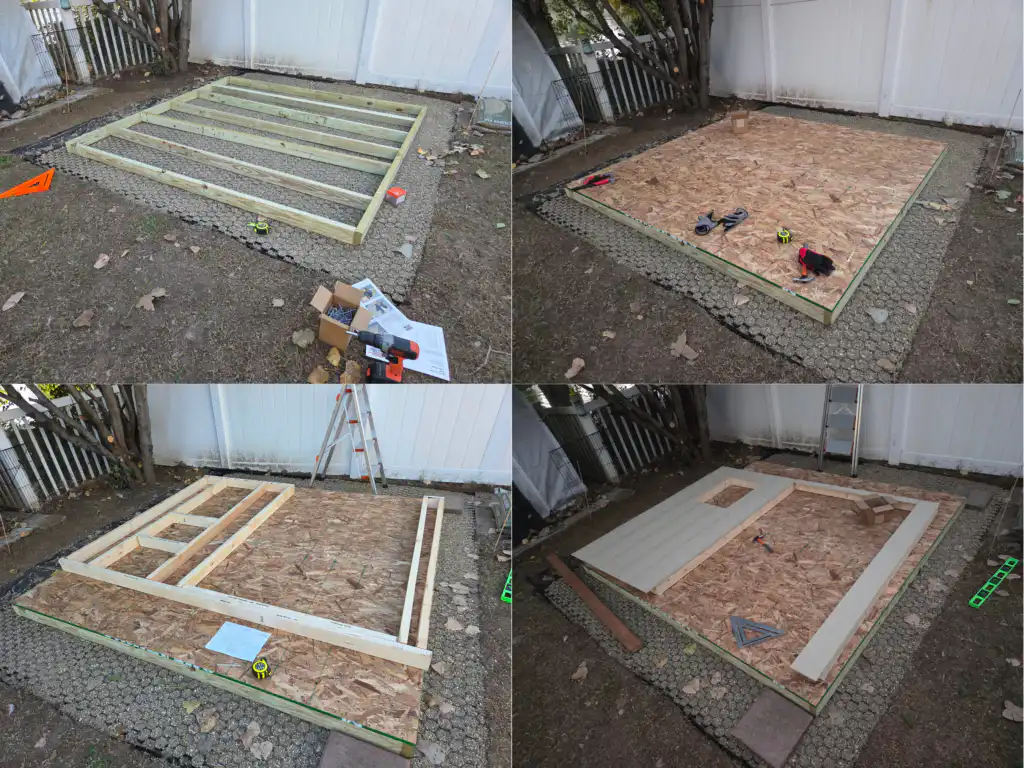
Framing and Finishing the Walls
Next, we framed all four walls. Each wall was assembled on the ground, then finished with the exterior siding while lying flat. Pre-finishing the walls before lifting them made the process so much easier.
Once each wall was complete, we lifted them into place one by one and secured everything together. Suddenly, the space transformed from a layout of boards to a tiny building taking shape.
Gable Structure and Roof Panels
With the walls firmly up, we installed the gable ends and roof plates. The frame locked together beautifully, and once the roof sheathing was attached, the shed immediately felt sturdy and weather-ready.
Shingle Roofing
Shingling the roof was one of the more time-consuming steps, but it was also incredibly satisfying, mostly because it made the shed look like a real little house. We started by installing the roof underlayment, giving the structure an extra layer of moisture protection beneath the shingles. After that, we added drip edges along the perimeter of the roof. These small metal strips help guide rainwater away from the edges of the shed and prevent water from seeping into the roof frame.
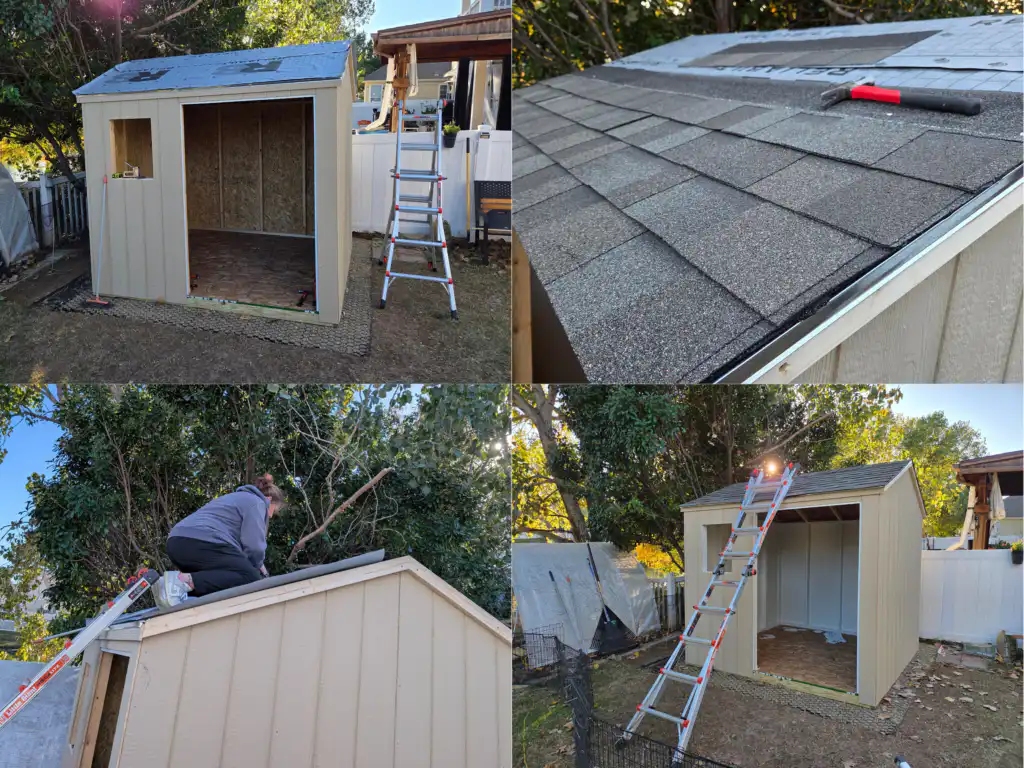
Once the prep work was done, we began laying the shingles. We chose shingles that match our house so the shed blends seamlessly into the yard. That one design choice alone made the entire building feel polished and intentional, almost like a miniature extension of our home. By the time the last shingle was nailed down, the shed had completely transformed from a simple frame into a charming duck cottage.
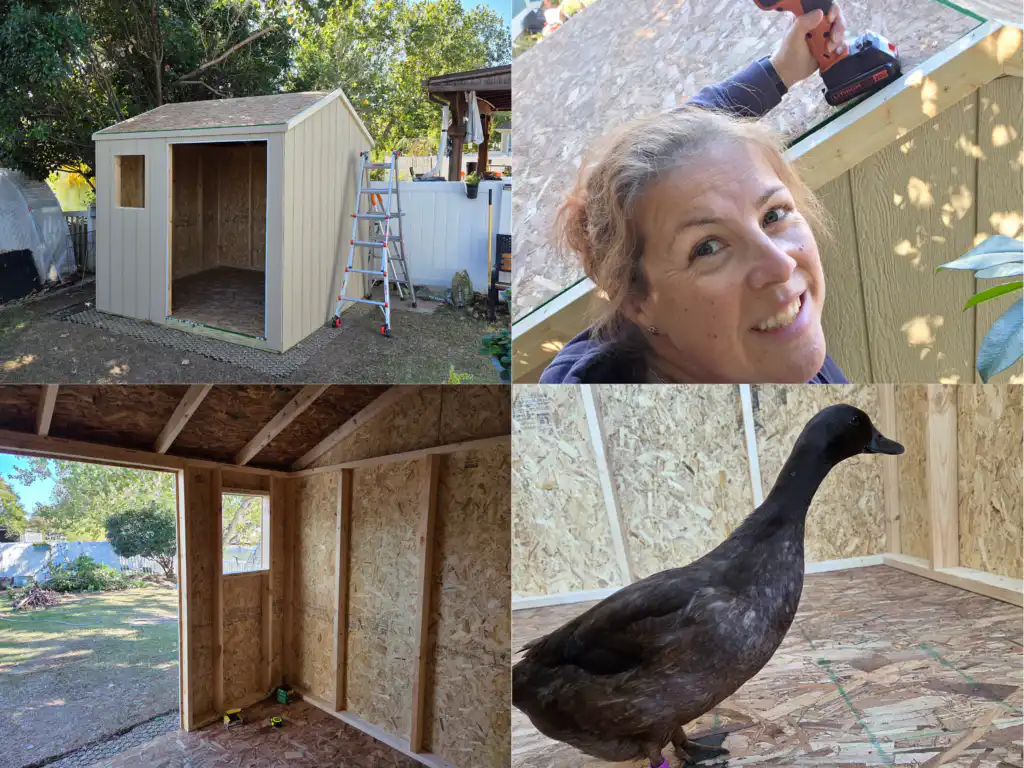
Painting the Exterior and Interior
Once everything structural was complete, we painted both the inside and outside of the shed.
- Outside: matched the color of our house for a cohesive, cottage-like look.
- Inside: coated with wipeable, moisture-resistant paint to make cleaning simple and protect the wood from humidity and bill-cleaning splashes.
Window and Door Installation
The shed kit came with a functional window with a screen, which we love because it adds extra ventilation on milder days. For predator safety, I installed an additional layer of hardware cloth on the outside of the window frame. This ensures that even if a predator or persistent critter tried to push through the screen, the flock would stay fully protected.
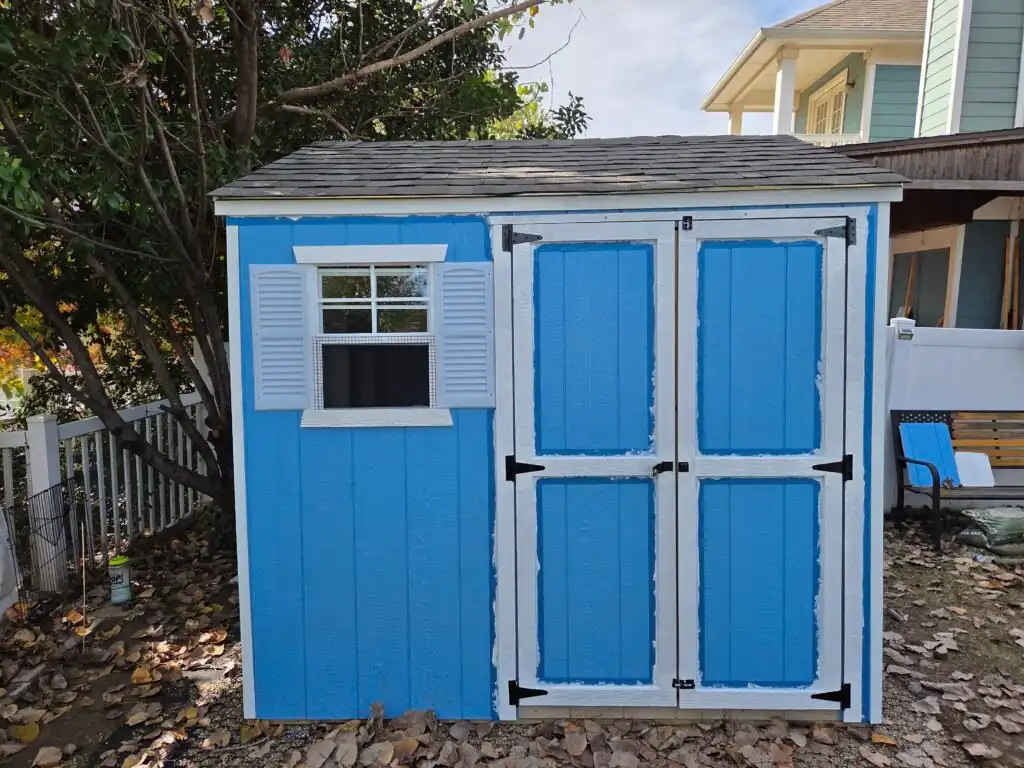
We also installed the main door and added trim, followed by trim painting to give everything a finished look.
Gable Vents and Duck Door
Next came the ventilation upgrades. We installed two gable vents, each backed with sturdy metal mesh so insects or rodents can’t enter while air can still flow freely. To install them, we first traced the vent outlines on the siding, then drilled a few starter holes to give our DeWalt reciprocating saw a place to begin cutting. From there, it was easy to cut out the openings and secure the vents in place. These ventilation additions made an immediate improvement in airflow and humidity control inside the shed.
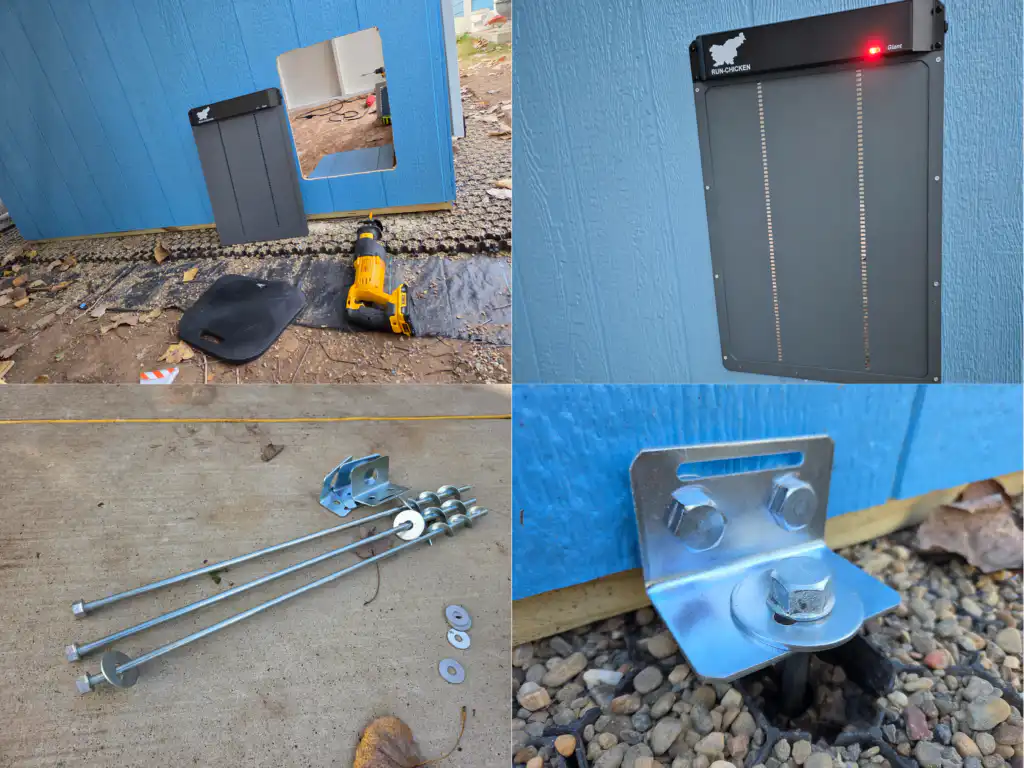
We also added the Run Chicken automatic duck door (affiliate link with code providence15 saves you 15%). This gave the flock their own entrance and made our nightly and morning routines so much easier. Installation was also surprisingly simple with our DeWalt reciprocating saw. Like for the vents, we first drilled a few starter holes in the siding to create openings for the blade, then cut along the outline of the door. After securing the frame, we programmed the door. Within minutes, it was fully functional and ready for the ducks to use. It fits beautifully on the shed wall, operates smoothly, and has already become one of our favorite upgrades.
Ground Anchors for Stability and Safety
To make sure the duck shed stays secure in strong winds and unpredictable Texas weather, we installed 2-foot ground anchors that drill deep into the soil. These anchors attach directly to the shed frame and act like heavy-duty stakes, preventing any shifting, lifting, or tilting over time. With our wide temperature swings, seasonal storms, and the occasional strong gust rolling through, adding anchors gave us extra peace of mind.
They were surprisingly easy to install. Using our DeWalt impact drill, the anchors went into the ground like butter. We positioned them at key points around the shed, drilled them down until fully seated, and tightened each bracket in place. Once secured, the entire structure felt noticeably more stable.
For a building that houses our flock, this level of reinforcement is absolutely worth the effort. It’s one more layer of protection, ensuring the ducks stay safe and the shed stays exactly where it belongs.
Interior Finishing
Inside, we installed sheet vinyl flooring, including running it slightly up the walls for better waterproofing.
We decided to use a dual-track upright wall shelving system so we could stay flexible and adjust shelf heights whenever needed. Ducks come with a surprising amount of gear:bedding, feed, medical supplies, toys, and seasonal items. And having a customizable system makes organization so much easier.
We installed the uprights along the entire 8-foot length of the back wall, giving us plenty of room to work with. For the shelves themselves, we cut pieces of plywood to size and painted them white to match the rest of the interior. Once the paint dried, the shelves slid neatly into place, creating a clean, cohesive look that blends right into the shed.
This setup now holds all our duck essentials: bags of bedding, feed containers, supplements, toys, and every little item that used to overwhelm our garage. Having everything in one organized, accessible place has already made daily duck care so much smoother. It keeps the shed tidy while giving the ducks the space they deserve.
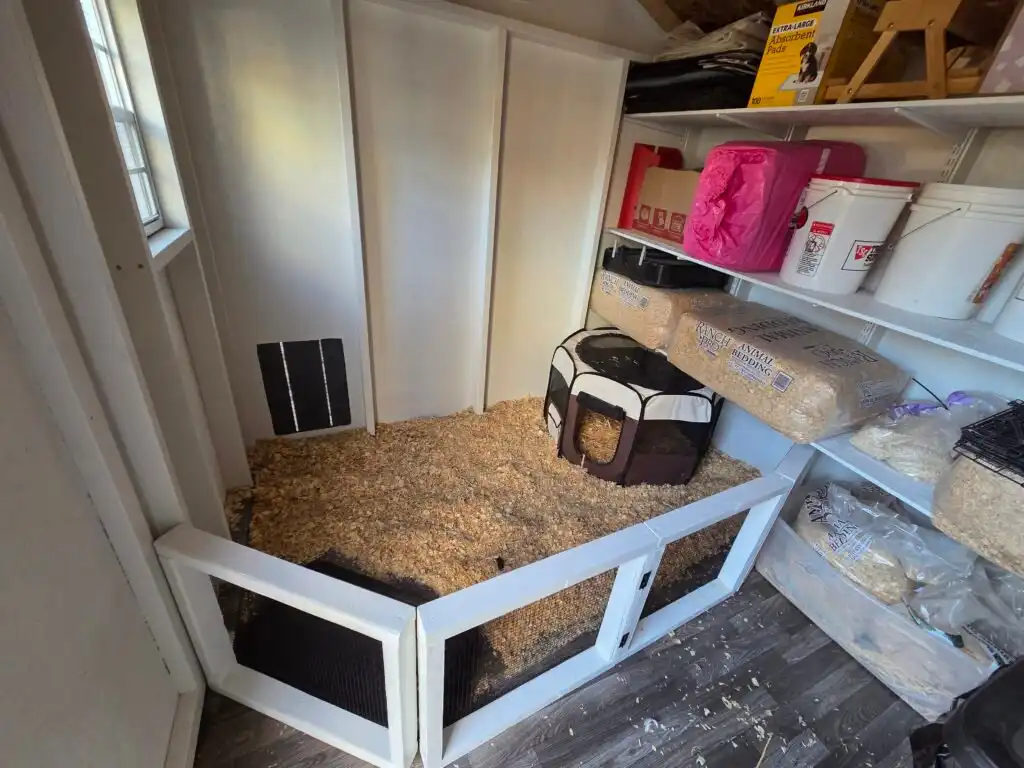
I built the floor separator using leftover scrap lumber, starting with a simple rectangular frame that I assembled and painted before adding any hardware. Once the paint dried, I attached hardware cloth to the frame to keep the duck area secure while still allowing plenty of airflow and visibility.
The separator is made of four individual panels, each about 2×2 feet, connected with hinges. This hinged design allows the entire divider to fold accordion-style, which makes it incredibly easy to move out of the way for cleaning, rearranging, or accessing the storage side of the shed. After everything was assembled, I gave the panels a final coat of the same water-resistant interior paint used throughout the shed so the divider blends right in and stands up to nighttime splashes and humidity.
This simple, flexible setup gives the ducks their designated half of the shed while keeping our storage side neat and accessible. It’s one of those small DIY touches that makes the whole space work even better for both them and us.
A Manageable Project for Laypeople
Yes, it took effort, patience, and a few sore muscles. But the entire project was surprisingly approachable for two people without professional carpentry skills. If you’ve ever been intimidated by DIY shed kits, our experience taught us that they’re far more doable than they appear.
And in the end, seeing the ducks waddle into their new space for the first time made every hour worth it. If you are intimidated by shed kits, this experience taught us they’re more doable than they look.
In case you are interested, we have bought the Little Cottage Co. 8×8 Value Workshop Shed with Operable Windows, Outdoor Wood Storage Do-It-Yourself Precut Kit with floor for about $2,000.
Move-In Day: The Big Moment
Once everything was painted, finished, and cleaned, it was finally time for the flock to explore their new home. I opened the door, stepped back, and waited to see what they would do. At first, they were a little skeptical, stretching their necks, peering inside, and giving a few soft murmurs as if debating whether this new cottage could really be theirs.
But, as always, curiosity won. One brave duck waddled in, then another, and soon the whole group was shuffling through the doorway to investigate. They inspected every corner, tested the vinyl flooring with their bills, and peeked behind the separator to make sure they understood the full layout.
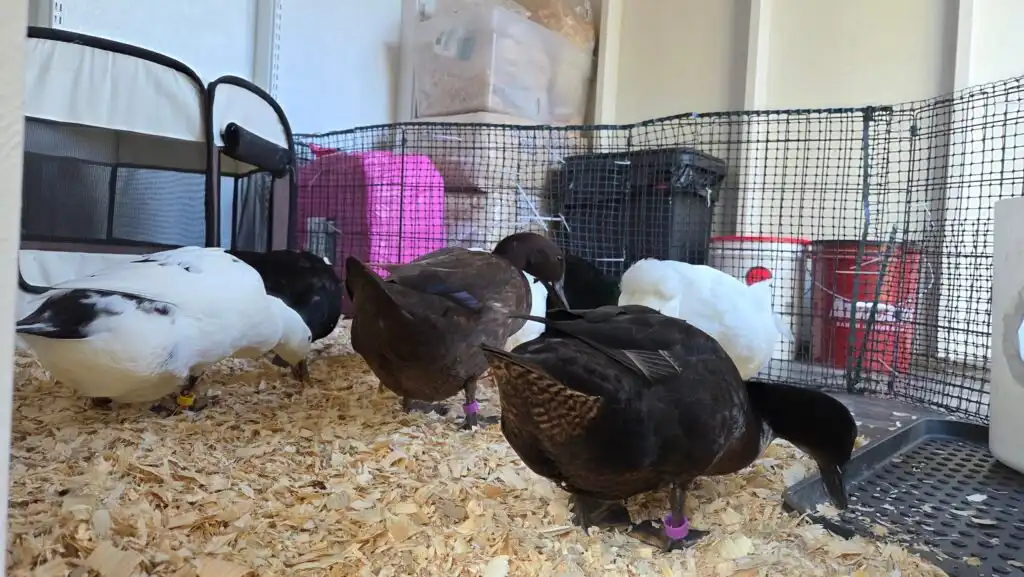
To help them settle in more easily, I had set up the interior to feel familiar and comforting. Their bedding is soft pine shavings, something they know and love, and in one corner I placed their favorite playpen, the same one they have used for years. It’s filled with cozy straw so they can make a warm, comfortable nest for the night. As soon as they saw it, they relaxed noticeably. That familiar space acted like a little anchor in their brand-new home.
And then something truly heartwarming happened: once it was time to sleep, they walked right into their little playpen bed, tucked themselves into the straw, and snuggled together just like always. Seeing them settle so peacefully into this new space was one of the best moments of the entire project. Within minutes, the shed felt like a real home, not just because we built it for them, but because they genuinely loved it.
After Two Weeks: How It’s Working
Two weeks in, we can confidently say that this duck shed is everything we hoped for—and more. All the planning, painting, measuring, and hammering paid off in ways we feel every single day.
- The inside stays dry and fresh, even with nighttime water access.
- The ventilation keeps humidity low and the air quality excellent.
- The vinyl floor wipes clean in seconds, which saves us so much time.
- The automatic door runs flawlessly and fits perfectly into our bedtime routine.
- And the ducks sleep comfortably with plenty of room to stretch, preen, and settle.
What has surprised us most is how quickly the flock adapted. They absolutely adore their playpen corner, the straw-filled nest has become their little sanctuary. Every night, they march right in, fluff up their bedding with happy bill movements, and snuggle into their familiar cozy spot. It’s as if this shed has been theirs for years.
They’ve also learned exactly how the door system works. They understand when it’s time to head inside, and as soon as everyone is accounted for, they loaf contentedly, waiting for their bedtime snacks and the gentle click of the door closing.
And I’ll admit it: I love to check on them through the Ring camera. Watching them settle in, preen softly, or wiggle into their straw bed still makes me smile every single night. The shed has given them comfort and safety, but it has given us peace of mind and joy, too.
Most importantly, they love it, and so do we.
Final Thoughts
Building this duck shed has been one of the most meaningful projects of our duck-keeping journey. Every step, from leveling the foundation to adding the last bit of trim, was guided by a simple goal: to give our flock a safe, spacious, and comfortable home that will support them for many years to come. Ducks bring so much joy into our lives, and creating a space that reflects how deeply we care for them felt incredibly rewarding.
This shed represents more than just wood, shingles, and paint. It reflects everything we’ve learned in four years of caring for ducks: how much space they truly need, how important ventilation is, how quickly moisture can build up, and how essential it is to design housing that is both easy to clean and easy to maintain. It also reflects the emotional side of duck keeping, the desire to keep them safe from predators, to give them warmth on cold winter nights, and to offer them a place where they can relax, preen, and simply be ducks.
And after losing Hertha and Penny, this project took on an even deeper meaning. Creating a secure, cozy home for the rest of the flock felt like a way to honor everything we’ve experienced with them over the years, the joys, the challenges, and the memories we hold close. Seeing the ducks settle into their new space, snuggle into their straw bed, and embrace their new nightly routine has been healing and heartwarming.
Now, each evening when I guide the flock inside, hand out bedtime Grubblies, and watch them nestle into their playpen, I’m reminded why this duck shed matters so much. It gives us peace of mind. It gives the ducks comfort and safety. And it strengthens the connection we have with them, night after night.
If you’ve been dreaming about upgrading your own duck housing, I hope our experience encourages you to take the leap. A well-designed duck home doesn’t have to be complicated or intimidating. It just needs to be thoughtful, functional, and created with love. And when you finally see your ducks waddle inside, settle down, and sigh into their little straw nest, you’ll know it was all worth it.
What features would your ducks enjoy most in their dream home?
Further Reading & Resources
- How to keep your ducks safe from predators?
- Our new duck run: A DIY guide from start to finish
- 17 Duck Predators – Common And Not-So-Common Ones
- Creating the Perfect Home for Your Pet Ducks: Housing, Space, and Safety Tips
Is your habitat optimized for safety? Return to the Habitat Guide for more research on predator-proofing and sanctuary design.